
California homeowners face a unique mix of climate demands, from fog-cooled coastal mornings to hot, dry inland afternoons. In that context, blown-in attic insulation stands out as a practical, high-impact upgrade that quickly improves comfort and efficiency. Whether you live in a coastal bungalow or an inland two-story, understanding how blown-in options work, what benefits they deliver, and what drives project budgeting can help you plan a smart, long-lasting retrofit. Early in your research, it also helps to compare installers and methods for attic insulation so you know which approach best fits your home and goals.
What Is Blown-In Attic Insulation?
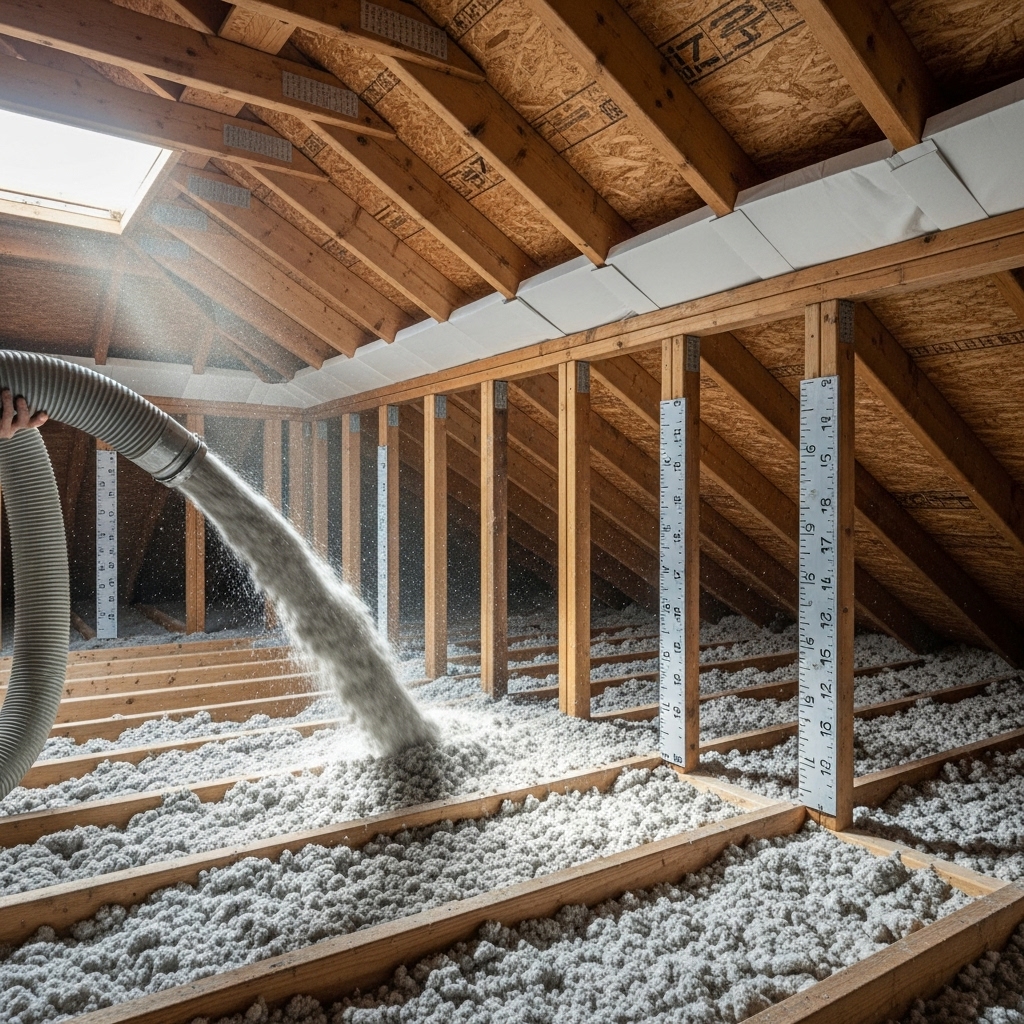
Blown-in insulation—sometimes called loose-fill—consists of small particles that are machine-blown across the attic floor to achieve a uniform thermal layer. Two materials dominate residential projects: cellulose and fiberglass. Cellulose is typically made from recycled paper that is treated for fire resistance and pest deterrence. Fiberglass uses spun glass fibers engineered to resist heat flow with very low weight. Both can be installed to specific R-values, the measure of thermal resistance, by following manufacturer-specified coverage charts and densities.
Unlike batt insulation, which comes in pre-cut rolls, blown-in fills the irregular gaps and odd-shaped cavities common in older attics. It can be topped up over existing insulation if the current material is clean, dry, and in good condition, or installed as a full replacement after removal of contaminated or inadequate materials. Installers use hoses to distribute fibers, aiming for consistent depth and to avoid low spots that compromise performance.
Why Blown-In Works So Well in California
California’s weather puts a premium on both heat rejection and heat retention. In coastal zones, attics benefit from additional thermal resistance to moderate temperature swings and manage moisture. In inland and desert-adjacent zones, the attic can become a major source of heat gain in summer; boosting R-value with blown-in insulation slows that heat transfer, reducing the workload on cooling equipment.
- Comfort: A deeper, uniform layer can smooth temperature fluctuations across rooms, especially upper floors.
- Energy efficiency: Better thermal resistance reduces heating and cooling run time, lowering energy waste and improving overall home performance.
- Noise reduction: Dense cellulose can help dampen outside noise, while fiberglass helps soften sound transmission through the ceiling plane.
- Speed of installation: Many homes can be upgraded within a day, minimizing disruption.
- Fit for irregular spaces: Loose-fill flows around wires, pipes, and framing, creating more complete coverage than many cut-and-fit solutions.
California Codes, Climate Zones, and Best Practices
California’s Title 24 energy standards encourage robust attic R-values and airtight construction. While individual requirements vary by climate zone and project scope, most homes benefit from raising attic R-values well beyond outdated levels common in older housing stock. In practice, that means targeting a depth that matches local recommendations and ensuring continuity around the entire attic floor.
Ventilation matters, too. Even with excellent thermal resistance, attics need appropriate intake and exhaust ventilation—typically at eaves and ridges—to manage moisture and roof deck temperatures. Baffles at the eaves keep the insulation from blocking airflow while allowing the full, specified depth to extend to the perimeter. Air sealing before blowing in new material is a critical best practice: sealing plumbing penetrations, wiring holes, and the attic hatch reduces unwanted air movement that undermines insulation performance.
Cost Considerations Without the Guesswork
Homeowners often ask what determines project budgeting for blown-in insulation. While every attic is different, the major drivers are consistent. Thinking in terms of scope instead of dollars helps you plan a result that delivers the comfort and efficiency you want without surprises.
- Existing conditions: Clean, dry, and uncontaminated insulation can sometimes be topped up. Mold, rodent damage, or fire damage typically require removal before new material is installed.
- Target R-value: Higher R-values require more material and time to achieve, especially if air sealing and ventilation improvements are included.
- Access and complexity: Tight hatches, low roof pitches, or extensive mechanicals in the attic can add time and care to the job.
- Air sealing scope: Comprehensive air sealing reduces drafts and improves overall performance but adds steps before blowing in insulation.
- Ventilation adjustments: Adding baffles, correcting blocked eaves, or balancing intake and exhaust improves longevity and effectiveness.
- Disposal and cleanup: Responsible removal and disposal of damaged or contaminated insulation adds labor and handling.
Because these factors vary, the most reliable way to plan a project is to request an assessment that includes air sealing, ventilation, and insulation depth targets, rather than focusing solely on material type. Mid-project changes are less likely when all these pieces are mapped out in advance.
Cellulose vs. Fiberglass: Which Is Better?
Both cellulose and fiberglass deliver excellent performance when installed correctly. The choice often comes down to project goals, installer expertise, and preferences.
- Cellulose: Often denser and effective at filling small gaps; can offer sound-dampening benefits. It is made from recycled content and treated for fire resistance.
- Fiberglass: Lightweight and resilient, fiberglass resists settling and is widely available. It is noncombustible and less sensitive to moisture when kept dry with proper ventilation.
For many California attics, either material can meet or exceed the recommended R-value, provided air sealing and ventilation are handled correctly. It is common to select the material the crew installs most expertly, since workmanship has a large impact on results.
Air Sealing: The Hidden Partner of Insulation
Insulation slows heat transfer, but air sealing stops undesirable air movement through the ceiling plane. Typical leakage points include recessed light housings (especially older, non-IC-rated fixtures), plumbing stacks, top plates, attic hatches, and chases around flues or ducts. Sealing these gaps with appropriate methods—such as fire-safe sealants near flues and rigid covers over recessed can lights—prevents conditioned air from escaping and keeps attic air out of the living space.
Sealing first allows blown-in material to perform closer to its labeled R-value, particularly on windy or extreme-temperature days. Many homeowners report noticeable improvements in comfort after air sealing even before the insulation is added.
Installation Process: What to Expect
- Inspection and planning: The crew examines the attic for contamination, wiring, ducts, and ventilation. They measure the area and set target depths based on climate and code guidance.
- Preparation and protection: Living spaces are protected with drop cloths, and attic pathways are planned for safe movement. Baffles are installed at eaves, and rulers are stapled to rafters to help verify installed depth.
- Air sealing: Penetrations are sealed, the attic hatch is upgraded or weatherstripped, and can lights are addressed as needed.
- Blowing insulation: Using a blowing machine and hose, installers distribute material evenly to the planned depth, working from the perimeter toward the hatch to avoid trampling freshly placed fibers.
- Quality checks: The crew verifies the depth at multiple points, confirms that ventilation remains clear, and cleans up before leaving.
Responsible installers document the final depth and material used, often with photos. This record helps with resale disclosures and future maintenance.
Mid-Project Decisions and Upgrades
During installation, crews sometimes uncover issues that are best addressed on the spot, such as a leaky vent boot or a disconnected bath fan duct. Dealing with those items before the insulation goes down can prevent moisture problems and performance losses. If you also plan to replace or seal attic ducts, coordinating that work with your insulation upgrade avoids re-entry and disturbance later. For homeowners comparing methods, it is a good time to revisit your research about attic insulation to ensure you are choosing the solution that aligns with your ventilation and air sealing strategy.
Common Mistakes to Avoid
- Skipping air sealing: Insulation alone cannot stop drafts and can underperform when air leaks are left open.
- Blocking eave vents: Without baffles, insulation can slide into soffits and choke ventilation pathways.
- Inconsistent depth: Low spots act like thermal shortcuts; use depth markers and systematic coverage to ensure uniformity.
- Ignoring the attic hatch: An uninsulated, leaky hatch cancels out a lot of hard-won performance; insulate and weatherstrip it.
- Covering knob-and-tube wiring: Older wiring should be evaluated by an electrician; some systems require clearance or upgrades before insulation.
Maintenance and Longevity
Blown-in insulation is largely set-and-forget, but periodic attic checks are smart. Inspect annually for signs of pests, roof leaks, or ventilation blockages. After roof work or major storms, verify that the material has not been displaced. If you add new wiring or mechanicals, ask the contractor to restore insulation and depth afterwards. Well-installed blown-in systems can perform for decades, especially when moisture is controlled and ventilation is balanced.
Health, Safety, and Environmental Considerations
Cellulose’s recycled content and fiberglass’s inert mineral base both appeal to environmentally conscious homeowners. Always verify that materials meet current fire-safety treatments and that installers use appropriate respiratory protection during installation. Homeowners should stay out of the attic while work is underway and during initial dust settling. Once completed, the living space should remain clean, and any attic dust should be contained by the hatch and air sealing measures.
How to Plan Your Project Timeline
Most blown-in retrofits are straightforward, but allow extra time if removal, air sealing, duct repairs, or ventilation upgrades are included. Scheduling is also easier outside of peak heating and cooling seasons. If your home also needs weatherization upgrades such as door weatherstripping or duct sealing, bundling them can amplify results by ensuring your new attic insulation is part of a complete building-performance plan.
FAQ
Q: Can blown-in insulation be installed over existing batts?
A: Yes, as long as the existing material is dry, clean, and even. Compressing batts with loose-fill reduces performance, so installers may adjust coverage to avoid uneven layers. If the existing insulation is contaminated or badly installed, removal is recommended before blowing new material.
Q: How do I know how much insulation I need?
A: An assessor will translate your climate zone and home conditions into a target R-value and depth. Depth rulers and coverage charts guide installation. The goal is consistent R-value across the entire attic floor, including the perimeter near eaves.
Q: Will blown-in insulation help with summer heat?
A: Yes. It slows heat transfer from a hot roof deck into the living space, especially when paired with air sealing and proper ventilation. Many California homeowners notice more consistent upstairs temperatures after an upgrade.
Q: Is cellulose or fiberglass better for noise?
A: Cellulose’s density can provide an edge in sound damping, but both materials reduce noise compared to an underinsulated attic. Installation quality and air sealing also influence acoustic results.
Q: Do I need to replace my attic ventilation?
A: Not necessarily. Many attics just need baffles and cleared soffits to function properly. During an assessment, the pro verifies intake and exhaust and recommends adjustments if needed.
Q: Will adding insulation affect recessed lighting?
A: Older non-IC-rated fixtures need special treatment or replacement to prevent overheating. Pros use approved covers or maintain clearances as required by safety guidelines.
Q: How long does installation take?
A: Many projects finish in a day, though removal, air sealing, and ventilation work can extend the timeline. Planning for access and keeping pathways clear helps crews work efficiently.
Q: What about rodents or past pest problems?
A: If there are signs of infestation, removal and sanitation are critical before adding new insulation. Sealing entry points and improving ventilation reduces recurrence.
Ready to Improve Your Home Comfort?
If you are planning a retrofit or building an addition, the quickest path to a quieter, more comfortable home is a well-sealed attic with the right depth and material. Schedule an assessment to review air sealing, ventilation, and coverage strategy, and ensure your project meets California’s energy goals for the long term. To connect with specialists who focus on performance, durability, and clean installation practices, reach out to a trusted team for attic insulation and start designing your upgrade today.