
Why Blown-In Insulation Fits Malibu Attics
For many Malibu homeowners, blown-in insulation is the upgrade that transforms a drafty house into a calm, comfortable retreat. Malibu’s climate brings cool marine mornings, sun-warmed afternoons, and evening breezes. These shifts, paired with salt air and the occasional Santa Ana event, mean that a well-sealed, well-insulated attic delivers noticeable day-to-day benefits. Blown-in insulation—typically fiberglass or cellulose installed with specialized equipment—offers excellent coverage around joists, wiring, and irregular cavities that are common in older and custom homes.
What makes blown-in compelling is uniform coverage. Where batts can leave gaps around obstructions, blown material flows and fills, reducing thermal weak spots. When combined with disciplined air sealing at the ceiling plane, this approach limits the stack effect that pulls indoor air into the attic, curbing moisture risks in a marine-influenced environment. If you are deciding between materials or planning a whole-home envelope strategy, a conversation with professionals skilled in insulation installation can help you align goals, budgets, and sequencing.
Understanding Blown-In Materials
Fiberglass and cellulose are the most common blown-in materials for Malibu attics. Blown fiberglass is light, non-absorbent, and resists settling when installed at the correct density. Blown cellulose is typically treated with borates for fire and pest resistance and provides excellent sound control. Both, when installed correctly, deliver reliable thermal performance. Material choice often depends on your acoustic goals, environmental preferences, and any sensitivities to dust during installation.
For Malibu’s coastal climate, both materials are viable. The key is comprehensive air sealing beneath the insulation layer. Even the best insulation performs poorly if air leaks bypass it. The ceiling plane—around can lights, top plates, chases, and access hatches—should be sealed before the first bag is blown. This approach prevents humid outdoor air from migrating into the attic and condensing on cool surfaces, especially during marine layer events.
Attic Assessment Comes First
Every good project starts with a thorough inspection. Look for signs of roof leaks, staining on the underside of the sheathing, evidence of rodent activity, and blocked soffit vents. Verify that bathroom and kitchen exhaust ducts terminate outdoors, not into the attic. If old insulation is present and heavily soiled, plan for removal and cleaning before the new material goes in. Malibu homes sometimes contend with wildlife pressure; sealing entry points is as important as insulation.
Mapping air leaks is essential. Common culprits include gaps at drywall seams, penetrations for wires and pipes, open chases, and the attic hatch. Recessed lights that are not rated for insulation contact require special handling or replacement. Treating these details upfront ensures that the blown-in layer delivers the expected performance.
Vented vs. Sealed Attic Approaches
In a classic vented attic, insulation sits on the floor (the ceiling of the living space), and the attic itself is outside the conditioned envelope. Soffit-to-ridge airflow keeps the roof sheathing dry, while the ceiling-plane air barrier stops indoor air from entering the attic. This approach can work well in Malibu when baffles protect soffit vents and air sealing is thorough.
In a sealed attic approach—more common when equipment and ducts live in the attic—the roof deck is insulated and the attic becomes part of the conditioned space. While blown-in is generally used at the floor, not at the roof deck, some hybrid solutions pair blown-in at the floor in certain areas with spray foam or rigid insulation strategies elsewhere. The right choice depends on your architecture and mechanical layout.
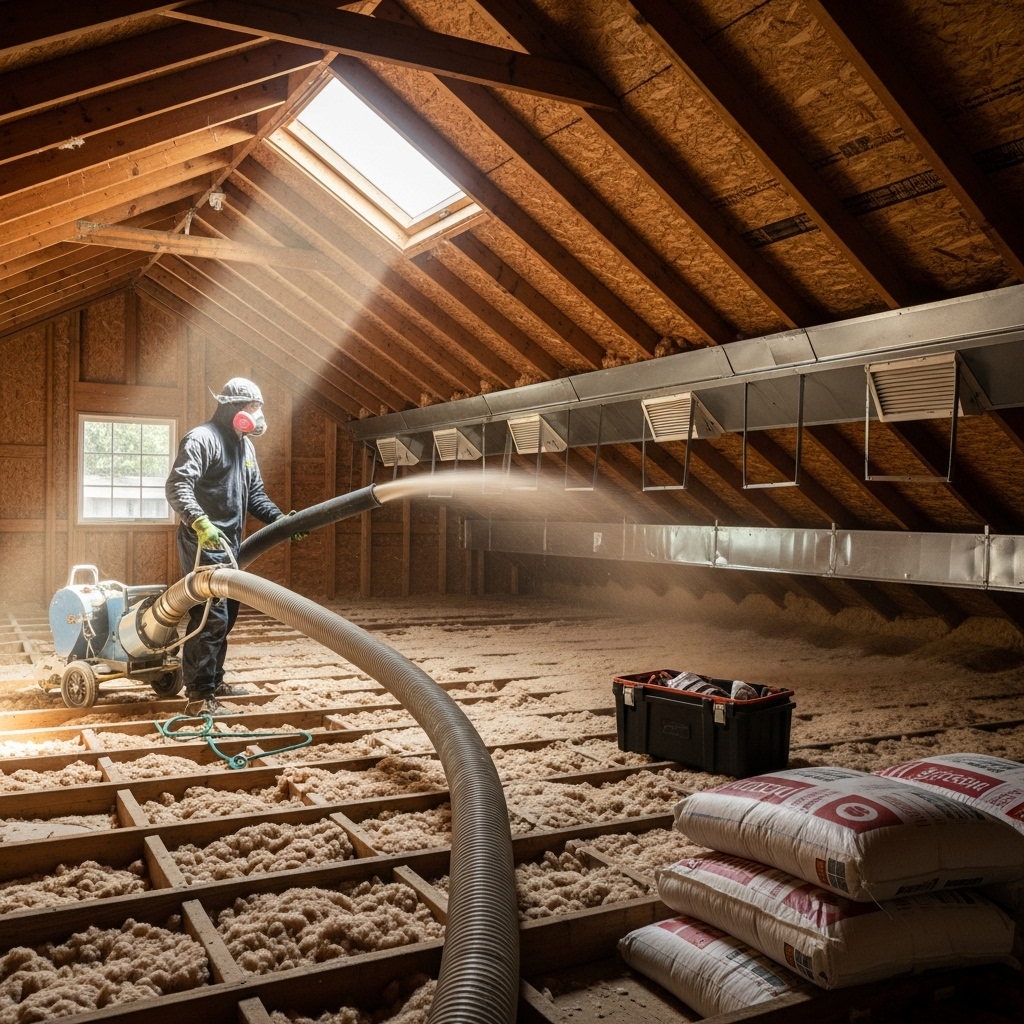
Installation Steps for Blown-In Insulation
Preparation: Protect finished areas, lay out depth markers across the attic, and install dams around the hatch and any mechanical platforms. Confirm baffles at all eaves, creating a continuous airway from soffit to roof vents.
Air Sealing: Seal top plates, wire penetrations, and chases with caulk, foam sealant, or appropriate fire-rated materials near flues. Upgrade non-IC-rated recessed lights or provide code-compliant separation.
Equipment Setup and Blowing: Stage the blowing machine, feed material at the correct rate, and maintain consistent hose movement to avoid low-density areas. Experienced installers track bag count, density targets, and coverage area to confirm that the final result meets specifications.
Final Detailing: Level the surface, verify depth near edges and transitions, and check that baffles remain unblocked. Label or photograph the finished work for your records.
Malibu-Specific Considerations
Marine Layer Moisture: Limiting air leakage from the living space into the attic helps prevent condensation on the underside of the roof sheathing. Robust air sealing and correct ventilation work together to protect the structure.
Salt Air and Corrosion: A tighter ceiling plane reduces salt-laden air movement through the building, which can help preserve mechanicals and electrical components located in or near the attic.
Acoustics: Ocean surf, canyon winds, and traffic can introduce background noise. Cellulose’s density and fiberglass’s coverage both contribute to quieter interiors; the best results come when air leakage is also addressed.
Wildfire Smoke and Embers: In areas where smoke or embers are a concern, a tighter envelope helps reduce particulate infiltration. While the attic is only one part of the system, it’s a critical one.
Quality Checks That Make a Difference
Depth and Density Verification: A uniform layer prevents hotspots and cold spots. Installers measure depth against markers and confirm density via bag count and coverage calculations.
Edge and Transition Detailing: Corners, knee walls, and around platforms can be weak points. Extra attention here pays dividends in performance.
Exhaust Duct Confirmation: Ensure bathroom and kitchen ducts are properly connected and sealed to exterior terminations. This avoids adding moisture to the attic environment.
Common Mistakes to Avoid
Skipping air sealing is the number-one error. Insulation slows heat flow; air sealing stops drafts. Blocking soffit vents with insulation is another frequent mistake—baffles are the solution. Insufficient depth near the edges of the attic compromises overall performance. Finally, ignoring rodent prevention can lead to contamination and displacement of the new insulation.
When Blown-In Is the Best Choice
Blown-in shines in attics with lots of obstructions or irregular framing. It’s also a strong contender when sound control is a priority, or when you want a fast, non-invasive upgrade after air sealing is complete. If you have ducts in the attic and are not ready to convert to a sealed, roof-deck-insulated design, improving the attic floor with blown-in can still deliver meaningful comfort gains.
Working with Professionals
A qualified team will propose an insulation plan tailored to your home’s layout and Malibu’s microclimate. They will document air sealing, confirm ventilation strategy, and provide photos of critical details. Midway through planning or during a pre-install walkthrough, it is often helpful to check scope, sequence, and expectations with a contractor focused on insulation installation so the final result matches your comfort goals.
Maintenance and Aftercare
Once installed, blown-in insulation requires little maintenance. Periodically inspect for signs of moisture after heavy coastal storms or roof work. Verify that exhaust ducts remain connected and that attic access hatches are still well-sealed. If you add wiring or devices later, ensure any displaced insulation is restored to its original depth and that new penetrations are sealed.
Frequently Asked Questions
Q: Will blown-in insulation settle over time? A: Properly installed materials maintain performance. Installers control density and verify coverage to minimize settling. If minor settling occurs, top-ups are straightforward.
Q: Which is better for Malibu—fiberglass or cellulose? A: Both work when paired with strong air sealing. Cellulose offers standout sound control and fire-retardant properties; fiberglass is clean, light, and moisture-resistant. Your goals and sensitivities guide the choice.
Q: Can I DIY blown-in insulation? A: Small projects can be DIY for experienced homeowners, but comprehensive air sealing and safe, uniform installation are easier with professional equipment and training, especially in complex Malibu attics.
Q: How do I handle recessed lights? A: Use IC-rated fixtures or follow code-approved methods to keep insulation away from non-IC-rated lights. Upgrading to IC-rated cans often simplifies the job and improves safety.
Q: Will blown-in help with indoor air quality? A: By reducing air leakage paths, blown-in combined with air sealing can help limit dust, allergens, and outdoor pollutants entering through the attic plane.
Moving Forward
Blown-in insulation is a proven path to a more comfortable, resilient Malibu home. With careful air sealing, ventilation planning, and quality-focused installation, your attic can transform into a quiet buffer that protects living spaces below. When you are ready to evaluate your attic and plan a seamless upgrade, reach out to trusted local experts in insulation installation and put your project on a confident path.