
California homes span coastal bungalows, fog-kissed Victorians, valley ranches, desert contemporaries, and mountain cabins, and each setting comes with distinct thermal, moisture, and ventilation demands. Learning how to perform insulation installation correctly means more than unrolling batts or blowing loose fill; it means understanding building science, regional codes, and the small details that yield durable comfort and efficiency. In this comprehensive how-to, you will discover preparation steps, material comparisons, safety practices, step-by-step methods for attics, walls, and crawl spaces, and quality checks that match California’s climate diversity and energy standards.
Before you begin, define your goals: reduce energy waste, improve indoor comfort, reduce noise, and protect your home from moisture and air leaks. Good planning lets you choose materials, R-values, and installation techniques that match your microclimate and house design. If you decide a professional touch is the right fit, consider trusted local expertise in insulation installation to ensure code compliance and high-quality results.
California’s building energy code is among the most advanced in the nation. While you can tackle many tasks yourself, matching the spirit of Title 24—focused on energy performance and building durability—requires careful work. This guide shows you how to evaluate existing insulation, seal air leaks, select the right R-value per zone, and install attic, wall, and crawl space insulation with attention to details like ventilation and fire safety. The result is a quieter, healthier home that is easier to heat and cool.
Why California Climate and Code Shape Your Approach
From the cool, damp coast to the hot Central Valley and high desert, California includes nearly every climate type in the contiguous United States. Insulation must handle heat gain from strong sun, overnight temperature swings, marine-layer humidity, wildfire resilience in some regions, and occasional winter cold snaps in mountain areas. Choosing materials and methods without considering these factors can lead to condensation, mold risk, or underperformance.
California’s energy code emphasizes proper R-values, continuous sealing, ventilation, and quality workmanship. Even if your project doesn’t require a permit, treating code standards as best practices improves results. Attics often benefit from R-38 to R-49 in many zones, walls typically need R-13 to R-21 depending on framing, and floors over crawl spaces may need R-19 or higher. Always confirm local requirements and your home’s construction details before buying materials.
Safety First: Personal Protective Equipment and Jobsite Prep
Insulation installation raises dust, fibers, and debris. Before you begin, assemble gloves, eye protection, and a proper respirator filter rated for fine particulates. Wear long sleeves and pants. Have bright, stable lighting, and use a sturdy work platform in attic spaces. If you’ll enter a crawl space, bring knee pads, a headlamp, and protective coveralls. Keep a first-aid kit nearby and confirm that your smoke detectors operate and your fire extinguisher is accessible.
Turn off power to circuits that pass through the areas you’ll be handling. In attics, use a portable work light and lay down temporary planks over ceiling joists to distribute your weight and prevent falls. Carefully identify any knob-and-tube wiring, unprotected junctions, or recessed lighting fixtures that need insulation standoffs. Mark any plumbing or mechanical equipment you must keep accessible.
Selecting Materials: Fiberglass, Cellulose, Mineral Wool, and Foam
Fiberglass batts and rolls remain popular for ease of installation and cost-effectiveness. High-density batts fit standard framing cavities and resist settling, though careful cutting and fitting are required to avoid compression and gaps. Faced batts include a vapor retarder that must be oriented correctly based on your region and assembly.
Cellulose, made from treated recycled paper, is commonly installed as loose fill in attics or dense-packed into closed wall cavities. It provides good coverage around irregularities and helps dampen sound. Proper density is essential in walls to reduce settling and maintain R-value.
Mineral wool batts offer fire and moisture resistance and maintain dimensional stability in slightly irregular cavities. They’re useful near heat-producing equipment (respecting clearance requirements) and in wildfire-prone areas where ember resistance matters.
Foam options include spray polyurethane foam (SPF) and foam board. Closed-cell spray foam provides air sealing and high R-value per inch, useful where space is limited or moisture control is critical. Foil-faced foam board can be combined with taped seams to reduce thermal bridging and provide a radiant barrier effect in certain assemblies. If using spray foam, follow manufacturer instructions meticulously and observe all safety precautions.
Assessing the Existing Building: Air Leaks, Moisture, and Ventilation
Begin with air sealing. Insulation works best when air leaks are minimized. Locate gaps around recessed lights, attic hatches, plumbing penetrations, wire holes, top plates, and chimney chases. Use fire-rated materials near flues as required. Apply sealants, gaskets, or appropriate foam to close gaps before any batts or loose fill go in.
Check for water stains, musty odors, or visible mold. Address roof leaks, flashing issues, or bathroom fan exhausts that dump moist air into the attic. Proper ventilation—supply and exhaust—keeps the building dry. In attics, baffles at the eaves maintain airflow above insulation, and bath and kitchen fans should vent outdoors. Crawl spaces often benefit from ground vapor control and strategic ventilation or encapsulation, depending on design and regional best practice.
Measuring and Planning: R-Values and Coverage
Calculate square footage of the spaces to insulate and determine target R-values. Attics are typically the most cost-effective area for upgrades due to large surface area and significant heat transfer. For batts, measure cavity width and depth carefully so you can buy the correct thickness. For loose fill, plan the number of bags based on coverage charts and desired R-value.
Decide if you will add to existing insulation or remove and replace. Dirty, rodent-infested, or compressed insulation often warrants removal. If adding loose fill over existing batts, avoid burying moisture problems or blocking soffit vents. Keep a clear boundary around recessed lighting fixtures and maintain required clearances around chimneys.
Step-by-Step: Attic Insulation with Loose Fill
1) Preparation: Protect the attic access area with plastic sheeting and staging. Seal air leaks first, install baffles at all eaves, and dam off areas around the hatch and any equipment platform to prevent loose fill from spilling or blocking airflow. Mark depth targets on rafters or install depth rulers throughout the space to track progress.
2) Equipment Setup: Position the blowing machine outdoors or in a well-ventilated area. Load material slowly and maintain steady hose movement. One person feeds the machine while the other distributes material in the attic.
3) Application: Begin at the perimeter and work toward the access point. Distribute insulation evenly, aiming for the specified settled depth for your desired R-value. Keep a consistent hose height and sweeping motion to avoid over-compaction. Check depth markers frequently. Do not cover any vents; ensure baffles remain clear.
4) Final Checks: Inspect for low spots, especially behind chimneys, around skylight wells, and near the hatch. Top up as needed. Label the attic near the access with the R-value, type of material, and date of installation for future reference.
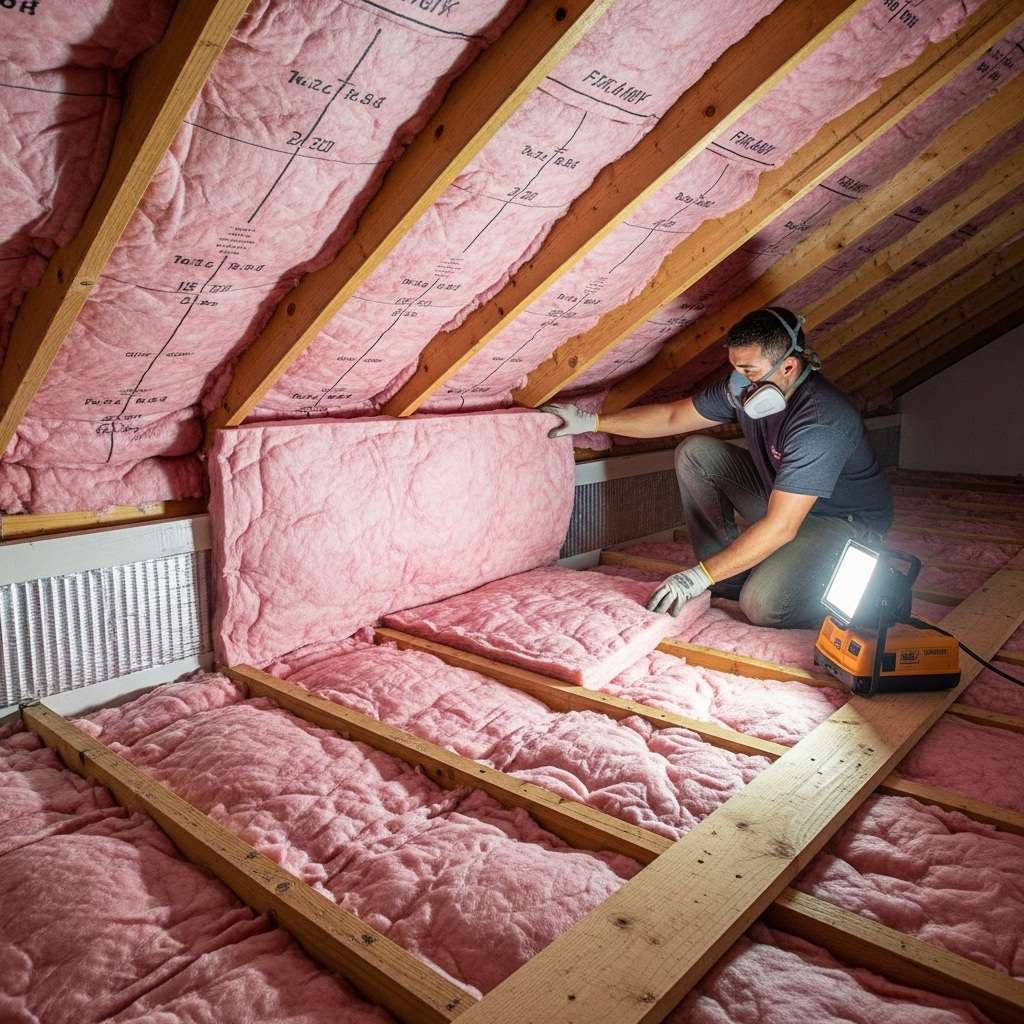
Step-by-Step: Attic Insulation with Batts
1) Preparation: After sealing leaks and setting baffles, measure cavities to select correct batt width and thickness. Unroll batts and let them expand. Cut carefully around obstructions, leaving a snug fit without jamming material tightly into place, which can reduce R-value.
2) Placement: Lay batts between joists with the facing (if any) positioned according to your assembly needs. In many California applications, unfaced batts or correct vapor retarder placement is preferable; verify local guidance. Stagger seams to reduce gaps and avoid compressing electrical cables or blocking fixtures that require clearance.
3) Cross-Layering: If depth allows, add a perpendicular layer across joists to reduce thermal bridging. Keep ventilation baffles clear and maintain the insulation dam around the attic hatch. Trim cleanly around can lights if they are rated for contact with insulation; otherwise, maintain a safe gap.
4) Inspection: Look for gaps along joists, corners, and edges. A flashlight beam held at a shallow angle can reveal uneven surfaces that indicate voids. Correct these before closing up.
Walls: Dense-Pack and Batt Techniques
Closed walls benefit from dense-pack cellulose or fiberglass blown behind netting or through small holes. Proper fill density prevents settling and improves air resistance. Plug holes neatly and patch the finish after installation. For open framing during remodels, mineral wool or fiberglass batts are straightforward: cut to fit with no voids and maintain full loft. In advanced retrofits, consider continuous exterior foam board to reduce thermal bridging through studs.
Pay special attention to wall-to-floor and wall-to-ceiling connections where air leakage is common. Seal top and bottom plates, and ensure window and door rough openings are foamed and sealed appropriately before insulating the surrounding cavities.
Crawl Spaces and Floors
Floors over vented crawl spaces often benefit from batt insulation placed snugly against the subfloor. Use appropriate supports so the batts do not sag. Seal plumbing and wiring penetrations through the floor to reduce stack effect. If your strategy involves encapsulating the crawl space, coordinate insulation with ground vapor control and perimeter sealing so the assembly manages moisture effectively.
Inspect for drainage issues around the foundation. Standing water or frequent dampness will undermine insulation performance and can introduce health risks. Solve bulk water problems before any insulation goes in.
Managing Thermal Bridging and Air Barriers
Insulation slows heat flow, but framing members still conduct energy. Where possible, add a continuous thermal layer—like foam board—over framing members. Tape seams and integrate this layer with air sealing to create a continuous air barrier. Around penetrations, sleeves and gaskets help maintain continuity.
In attics, thermal bridging occurs at joists and rafters. A cross-layered batt or a uniform blanket of loose fill above joists reduces this effect. At rim joists, cut-and-cobble foam with sealed edges is a popular approach to limit air leakage and thermal loss.
Mid-Project Quality Control
Pause midway to verify coverage, depth, and clear ventilation pathways. Use a ruler to check loose-fill depth in several spots, and re-measure batt cavities to confirm full loft without compression. If you are balancing DIY effort with expert help, you might schedule a consultation on insulation installation during this checkpoint to ensure the work tracks with best practices.
Take photos of hidden assemblies before closing walls or covering areas. These records help with future maintenance and any resale inspections. Label materials and R-values clearly where they will be useful later.
Fire Safety, Recessed Lights, and Mechanical Clearances
Respect all clearance requirements to chimneys, flues, and non-IC-rated recessed lights. Use metal or approved barriers to keep insulation away from heat sources. Where fixtures are IC-rated, you may cover them with insulation; however, check the specific rating and manufacturer guidance. Do not block combustion air for gas appliances, and ensure that bath fans, range hoods, and dryers vent outdoors.
In wildfire-prone areas, consider materials and details that resist ember intrusion. That includes protected vents, intact soffit screens, and sealing of gaps that might allow embers to enter cavities. Mineral wool can add a layer of resilience near vulnerable areas, combined with careful detailing at eaves.
Common Mistakes to Avoid
Skipping air sealing is the biggest error. Insulation without air control performs below expectations and can allow moisture-laden air to reach cold surfaces, creating condensation. Other pitfalls include compressing batts to fit, blocking soffit vents, neglecting clearance around heat sources, failing to right-size R-values, and leaving gaps in awkward corners or behind utilities.
Another frequent issue is forgetting accessibility and serviceability. Future repairs or inspections will be difficult if hatches are buried or ducts become inaccessible. Create insulation dams and labeled pathways where necessary.
Post-Installation Verification
After the installation, verify performance. Check that the attic hatch is insulated and weatherstripped. Confirm that bath fans actually move air to the exterior. Feel for drafts around fixtures and along baseboards during a windy day; if present, trace and seal. In the first season after the upgrade, monitor indoor humidity and watch for any signs of moisture staining or odor. Tweak ventilation as needed.
Consider a blower-door test to quantify leakage improvements and a thermal imaging scan during a temperature differential to locate any remaining weak spots. These tests validate your effort and guide final touch-ups.
Frequently Asked Questions
Q: What R-value should I target in a typical California attic?
A: Many homes benefit from R-38 to R-49 in the attic, depending on climate zone and roof configuration. Focus first on air sealing and ventilation, then choose the insulation depth that meets or exceeds local recommendations.
Q: Can I add new insulation over old insulation?
A: Yes, provided the existing material is dry, clean, and free of contamination or severe compression. Address moisture sources, fix air leaks, and maintain clear ventilation before topping up.
Q: How do I handle recessed lights?
A: For IC-rated fixtures, insulation can usually cover the fixture. For non-IC-rated lights, maintain required clearance or install appropriate barriers. Always check the fixture rating and follow safety guidelines.
Q: Is a vapor retarder necessary in California?
A: It depends on your microclimate and assembly. In many regions, minimizing interior vapor retarders and focusing on air sealing and controlled ventilation is effective. Verify local best practices for your exact conditions.
Q: Should I remove rodent-contaminated insulation?
A: Yes. Contaminated material should be removed and the area cleaned and sealed before new insulation is installed. Address entry points to prevent recurrence.
Get Started Today
You now have a practical framework for assessing, planning, and completing an insulation upgrade in a California home. Prioritize air sealing, choose appropriate R-values and materials, and respect ventilation and safety details. If you want expert support that aligns with state energy standards and local conditions, explore professional insulation installation and move confidently toward a quieter, more efficient home.