
Start with a Clear Plan
A successful insulation upgrade in Malibu begins with a structured checklist. Whether you are refreshing a drafty attic, addressing wall cavities during a remodel, or preparing a crawlspace, a deliberate sequence prevents surprises and protects the home. Malibu’s coastal climate—salt air, marine moisture, sun, and hillside winds—makes attention to detail especially important. The checklist below combines preparation, safety, installation, and verification steps so your project stays on track from first inspection to final walkthrough.
If you are at the exploration stage and want to confirm scope, materials, and timing, consider a consultation with specialists in insulation installation. Early guidance helps you coordinate trades, avoid common pitfalls, and choose the best strategy for Malibu’s conditions.
Pre-Inspection and Assessment
Document Existing Conditions: Photograph attics, walls, and crawlspaces. Look for moisture staining, roof leaks, or signs of past water intrusion. Malibu homes exposed to marine layers often show subtle staining on roof sheathing; note areas that need attention.
Identify Hazards: Confirm electrical safety, identify any non-rated recessed lights, and look for signs of rodents or other pests. If you suspect legacy materials that require special handling, plan for testing and proper remediation before work begins.
Evaluate Ventilation Paths: In attics, verify soffit and ridge vent continuity. In crawlspaces, check for ground moisture and ventilation or encapsulation strategies appropriate to the assembly. Ensure exhaust fans in bathrooms and kitchens terminate outdoors.
Mechanical Coordination: Note locations of HVAC equipment, ducts, and plumbing. Malibu homes often have equipment in attics; this influences whether you insulate the roof deck or the attic floor. Discuss fresh air and ventilation strategies if you plan to tighten the envelope.
Scope Definition and Goals
Clarify Objectives: Are you prioritizing comfort, sound control, humidity management, or preparing for electrification and future HVAC upgrades? Your goals guide material and assembly choices.
Select Assemblies: Decide where you will insulate—attic floor, roof deck, exterior walls, rim joists, or crawlspace. Consider a phased approach if a full-home upgrade is not practical right now.
Choose Materials Thoughtfully: Blown-in fiberglass or cellulose for attic floors, spray foam for roof decks or rim joists, and dense-pack or batts for walls—each has strengths. Match materials to the assembly’s drying strategy and your performance goals.
Removal Planning
Determine What Must Go: Heavily soiled, compressed, or contaminated insulation should be removed. Rodent-affected materials carry odors and allergens; removal and sanitization protect indoor air quality. In walls, assess whether targeted removal or dense-pack retrofits are appropriate.
Set Up Containment: Protect living areas with dust barriers. Plan safe pathways for bagged material out of the home, especially in Malibu properties with limited access or hillside lots. Prepare for responsible disposal according to local guidelines.
Schedule the Sequence: Removal comes before air sealing and installation. Coordinate any electrical, plumbing, or ventilation repairs between those steps to avoid rework.
Air Sealing and Moisture Control
Seal the Ceiling Plane: In attics, focus on top plates, chases, wire penetrations, and around attic hatches. Replace or retrofit non-IC-rated recessed lights. Use appropriate sealants and fire-safe materials near flues.
Address Wall Penetrations: Seal around plumbing and electrical openings, window and door perimeters, and baseboards. Align air barrier details with the chosen insulation method.
Plan for Drying: Ensure that assemblies can dry in at least one direction. In roof-deck-insulated attics, verify that the moisture strategy matches Malibu’s coastal climate and your roofing system. In vented attics, maintain baffles at eaves to protect airflow.
Installation Steps by Area
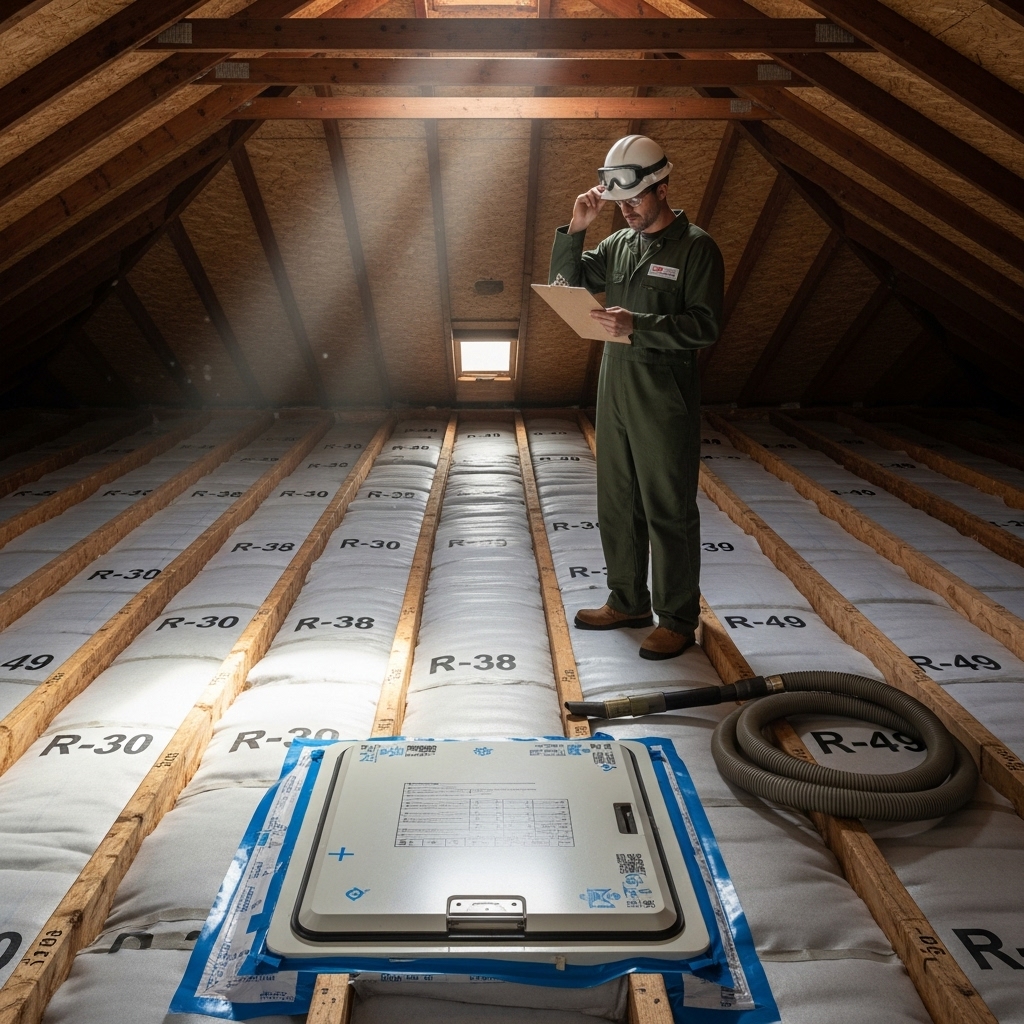
Attic Floor (Blown-In): After air sealing, install depth markers, dams around access points, and protect baffles at eaves. Blow material evenly, verifying coverage and depth throughout. Keep insulation clear of non-IC-rated lights and note any mechanical platforms.
Roof Deck (Spray Foam): Prepare substrates, protect finishes, and ventilate during installation. Apply foam in lifts for consistent thickness and adhesion. Trim where needed and verify that transitions at eaves, penetrations, and ridges are sealed.
Walls (Batts or Dense-Pack): For batts, fit without compression and seal plates and penetrations. For dense-pack, monitor density and hose placement to avoid voids. Coordinate window and door flashing details to maintain water management.
Crawlspace: Decide on vented versus encapsulated strategies. Add ground moisture protection where appropriate, insulate rim joists, and seal penetrations to limit drafts into the living space above.
Quality Assurance and Documentation
Visual Verification: Check for even coverage, well-fitted batts, and properly sealed transitions. For blown-in, confirm depth at markers; for foam, confirm consistent texture and adhesion.
Testing and Imaging: Consider blower door testing to quantify leakage reduction and infrared scans to identify any remaining gaps. These tools help verify performance and guide touch-ups before finishes are installed.
Recordkeeping: Keep photos of concealed areas, product data sheets, and notes on assembly details. Good documentation supports resale and future renovations.
Malibu-Specific Checks
Coastal Humidity and Salt Air: Air sealing reduces moist, salt-laden air movement through the home. Confirm that mechanical rooms and attic spaces with equipment are well protected and that fresh-air strategies are appropriate.
Wildfire and Smoke: In neighborhoods where smoke or embers can be an issue, tighter envelopes and well-detailed attic assemblies help reduce particulate entry. Coordinate with window and door upgrades for best results.
Access and Logistics: Malibu’s hillsides and narrow lanes can complicate staging. Plan for truck parking, hose runs, and material movement that minimize disruption to neighbors and protect landscaping.
Maintenance and Aftercare
Periodic Inspections: After storms or roof work, check attics and walls (where accessible) for moisture signs. Confirm that exhaust ducts remain sealed to the outdoors and that attic hatches stay weatherstripped.
Protect the Air Barrier: If you add recessed lights, wires, or devices later, reseal any penetrations. When remodeling, communicate the location of control layers—air, water, and vapor—so new work maintains continuity.
HVAC Coordination: A tighter home can change ventilation needs. Review fresh-air strategies and duct sealing with your HVAC contractor after insulation upgrades, especially if the attic becomes part of the conditioned space.
Frequently Asked Questions
Q: Should I remove old insulation or add new on top? A: If existing material is contaminated, compressed, or inconsistent, removal is the better path. Starting fresh allows comprehensive air sealing and delivers more predictable performance.
Q: What materials work best near the ocean? A: Fiberglass, cellulose, and spray foam can all perform well when assemblies are designed for Malibu’s humidity and drying needs. The right choice depends on your goals and the location within the home.
Q: How do I handle recessed lighting and electrical? A: Replace non-IC-rated fixtures or maintain required clearances. Seal around electrical boxes and penetrations. Coordinate with an electrician for safety and code compliance.
Q: Will insulation upgrades make my home too tight? A: A tighter envelope improves comfort and indoor air quality when paired with balanced ventilation. Discuss fresh-air strategies as part of the project plan.
Q: Can I keep items stored in the attic during work? A: It is best to clear the space. Dust management, hose runs, and movement of materials are safer and more efficient in an empty attic.
Ready to Put the Checklist to Work
A methodical approach transforms insulation projects from stressful to smooth. By pairing careful removal with air sealing, thoughtful material choices, and quality verification, Malibu homeowners can achieve durable results that feel great year-round. When you are ready to walk your home, confirm scope, and schedule the work, connect with trusted local professionals in insulation installation and move forward with clarity and confidence.