
Successful rodent sanitation starts with a smart inspection. In Malibu, California—where oceanfront properties, canyon homes, and mixed-use buildings share borders—an accurate assessment determines the scope of cleaning, disinfection, and any material replacement. This guide teaches property owners, managers, and diligent homeowners how to inspect for rodent-related contamination and plan a sanitation strategy that fits Malibu’s coastal climate. If during your inspection you decide you would rather have experts handle the process, you can book professional rodent sanitation to ensure nothing is missed.
Inspection is not just about spotting droppings. It is about reading patterns of movement, identifying moisture and odor sources, understanding building vulnerabilities, and prioritizing areas for thorough cleanup. The steps below cover preparation, tools, interior and exterior checks, documentation, and how to translate findings into a practical sanitation plan.
Preparation and Safety
Before the inspection, assemble basic PPE: gloves, eye protection, and a respirator if you expect to encounter dusty areas like attics or crawl spaces. Bring a bright headlamp, a high-lumen flashlight, a small mirror on an extension, a UV flashlight for urine detection, contractor bags, disposable towels, and a notepad or mobile app for recording findings. If an active infestation is suspected, consider staging traps and sealing obvious entry points before deep sanitation begins.
Create an Inspection Map
Draw a simple map of the property, including attic access, crawl-space entrances, garage doors, exterior doors, utility penetrations, vents, and landscaping features. Mark areas with suspected activity as you go. A map helps you plan an efficient sanitation route later, working from light to heavy contamination.
Exterior Inspection
- Perimeter scan: walk the foundation and look for gaps larger than a quarter inch around pipes, cables, and vents. Note missing door sweeps, gnawed edges, or warped thresholds.
- Landscaping: evaluate vegetation touching the structure. Tree limbs, vines, and dense shrubs provide bridges and cover. Plan to trim these during the prevention phase.
- Waste and storage: check trash enclosures and outdoor storage for droppings and gnaw marks. Ensure tight-lidded containers and regular rinsing are part of the plan.
- Roofline and eaves: use binoculars if necessary to spot gaps at the roofline, attic vents, and soffits. Look for staining near potential entry points.
- Decks and additions: inspect undersides for harborage, droppings, and burrow openings.
Interior Inspection: Room by Room
Inside, move systematically and take notes. Kitchens and pantries often show the earliest signs: droppings along baseboards, behind appliances, and in cabinet corners. In garages and storage rooms, pull items forward and inspect shelf edges and boxes. In attics, follow joists and eaves; in crawl spaces, examine sill plates, rim joists, and utility penetrations.
Signs to Document
- Droppings: note size, distribution, and whether they look fresh (shiny) or old (dull and crumbly).
- Nesting: shredded paper, insulation, or fabric grouped in protected pockets.
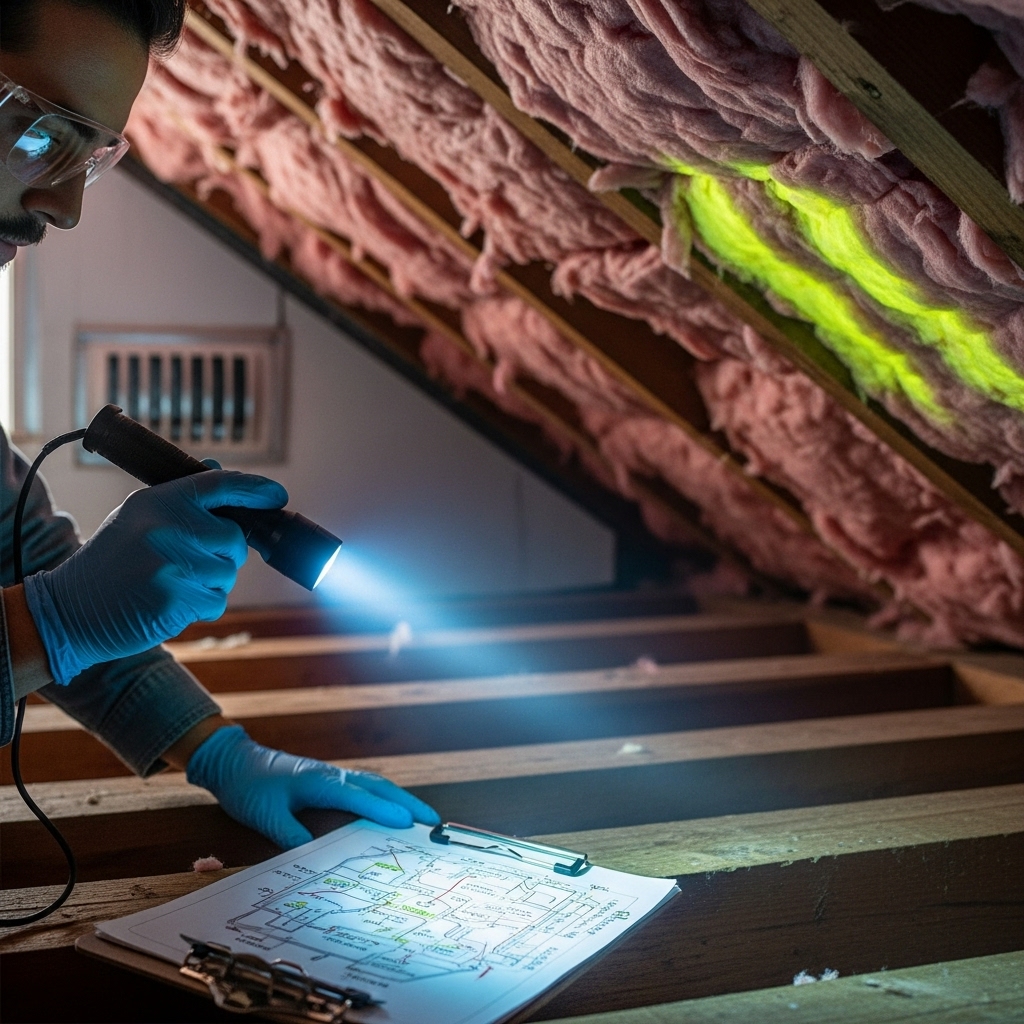
- Urine stains: use a UV flashlight to reveal patterns on surfaces or insulation.
- Rub marks: dark, greasy smudges along runways and entry points.
- Gnawing: damage on wood, plastic, cables, or food containers.
- Odor: persistent musky smells that indicate urine saturation.
- Noises: scratching or movement in walls or ceilings, particularly at night.
Assessing the Scope of Sanitation
Estimate whether contamination is light, moderate, or heavy. Light contamination may involve scattered droppings and minimal nesting; moderate may include multiple nests and soiled insulation; heavy often covers large zones with strong odors and material damage. Scope drives your approach to removal, disinfection, deodorization, and any replacement of porous materials.
Attic Inspection Tips for Malibu Properties
Attics in coastal climates can be humid, slowing the drying of disinfectants and deodorizers. Look closely along soffits and eaves where rodents travel, near HVAC lines and electrical penetrations, and at low-clearance corners that are easy to overlook. Blown-in insulation may conceal nests; use a gentle sweeping motion with a gloved hand to lift and look without dispersing dust. Plan to remove heavily soiled insulation, double-bag it, and replace it after the space is clean and dry.
Crawl-Space Inspection Tips
Use protective sheeting to avoid disturbing soil and to create a clean working surface. Inspect sill plates, rim joists, and plumbing penetrations carefully. Look for moisture problems—leaks, condensation, or poor drainage—that attract rodents and amplify odors. Make note of where hardware cloth is missing or damaged on vents, and plan to seal gaps larger than a quarter inch.
Kitchen, Pantry, and Interior Storage
Open lower cabinets and pull bottom drawers to inspect behind them. Check for droppings in corners and along baseboards, gnaw marks on packaging, and urine stains on shelving. Make a list of items to discard and areas requiring disinfection, and prepare to restore food storage using rodent-resistant containers.
Garage and Outbuildings
Cluttered areas harbor nests. Inspect shelf corners, under workbenches, and inside stored boxes. Plan to sort and clean items outdoors where ventilation is better. Make a disposal list for items that cannot be safely sanitized.
Documentation for a Solid Plan
Photograph evidence and record measurements of affected areas. Label your inspection map with priority zones for cleanup, locations of nests, and entry points to be sealed. Documentation helps you estimate materials—bags, disinfectant volume, enzyme deodorizer—and whether insulation or other materials will need replacement.
Translating Inspection to Action: Sanitation Plan
- Stabilize: ensure rodent control is complete and entry points are sealed.
- Prepare: gather PPE, disinfectant, HEPA vacuum, enzyme deodorizer, and contractor bags.
- Contain: isolate work areas and plan ventilation without spreading dust.
- Remove: pre-wet, lift droppings and nests, and double-bag waste.
- HEPA clean: vacuum fine dust from beams, ledges, and corners.
- Disinfect: apply EPA-registered products to non-porous surfaces, respecting dwell times.
- Replace: remove heavily contaminated porous materials like insulation and fiber ducts.
- Deodorize: apply enzyme products after source removal and disinfecting.
- Verify: perform UV checks, odor assessment, and activity monitoring.
Malibu Climate Considerations
Humidity from the marine layer and salt-laden air can influence drying time and material compatibility. Allow for extended ventilation and consider corrosion-resistant tools and products. Seasonal rains drive rodents to higher ground, making rooflines and attics key targets for exclusion after sanitation.
Common Pitfalls in Inspections
- Underestimating contamination hidden in insulation or storage.
- Skipping PPE, leading to unnecessary exposure to allergens and pathogens.
- Using regular vacuums that recirculate contaminated dust.
- Relying on deodorizer alone without removing the source.
- Failing to coordinate with HVAC or electrical professionals when damage is suspected.
When to Call Professionals
If your inspection reveals widespread contamination, persistent odors, or inaccessible zones, consider bringing in specialists. Professional teams can set containment, use HEPA-filtered negative air machines, remove and replace insulation safely, and perform targeted disinfection and deodorization. If mid-inspection you realize the scope is greater than anticipated, shift to expert rodent sanitation for efficient and complete results.
Frequently Asked Questions
Q: How long should an inspection take?
A: A thorough inspection of a single-family Malibu home typically takes one to three hours depending on attic and crawl-space access, storage density, and the number of rooms involved.
Q: What if I find contamination in ducts?
A: Engage HVAC professionals for inspection and potential cleaning or replacement. Replace air filters after sanitation is complete.
Q: Are UV flashlights necessary?
A: They are not mandatory but can reveal urine staining that is invisible to the naked eye, improving the accuracy of your sanitation plan.
Q: Do I need to remove all insulation?
A: Only where it is heavily soiled or odorous. Localized removal often suffices, but widespread odor may require broader replacement.
Q: Can I sanitize during business hours in a mixed-use building?
A: Plan sanitation during low-traffic periods and establish containment to protect neighboring units from dust and odors.
Q: How do I decide between DIY and professional service?
A: Consider scope, access, health sensitivities, and time. If you lack HEPA equipment or face extensive contamination, professional help is often the safest path.
Restore Health and Comfort to Your Property
A careful inspection sets the stage for effective cleaning, disinfection, and prevention. Use your findings to build a step-by-step plan, and address Malibu’s climate considerations to ensure long-lasting results. If you want a turnkey approach with documentation and specialized tools, schedule professional rodent sanitation and move forward with confidence.