
Why Attic Insulation Matters in Malibu
Living in Malibu means enjoying ocean breezes, mild winters, and sunny summers. Yet coastal homes can still suffer from thermal loss through the roof, salt-laden air that encourages corrosion, coastal fog that adds moisture, and sun exposure that heats up roof decks. Upgrading or adding attic insulation is one of the most effective ways to stabilize indoor temperatures, reduce HVAC strain, and enhance overall comfort year-round. A properly insulated attic also complements air sealing, ventilation, and duct improvements to create a comprehensive building-performance upgrade.
This step-by-step guide explains how to install attic insulation in Malibu, with local climate considerations, safety practices, recommended R-values, and practical techniques that both DIYers and first-time homeowners can follow. Even if you ultimately hire a professional, understanding the process will help you plan, prepare, and verify quality workmanship.
Understanding How Insulation Works
Insulation resists heat flow. In winter, it slows warm air from escaping your living spaces into the attic and outdoors. In summer, it reduces radiant and conductive heat from the roof from penetrating into the home. Malibu’s climate brings warm, sunny days much of the year, so attic insulation primarily combats solar heat gain while still protecting your home during cooler nights and seasonal cold snaps.
Common insulation materials include fiberglass batts and loose-fill, cellulose loose-fill, and mineral wool. Each has different R-values per inch, fire resistance, sound control, and handling considerations. Fiberglass is light and easy to install, cellulose offers excellent coverage and sound attenuation, and mineral wool provides high fire and moisture resistance. The right choice for you may combine product performance with what’s easiest to install safely and correctly in your specific attic.
R-Value Targets for Malibu Attics
R-value measures resistance to heat flow: higher numbers mean better performance. For Malibu’s coastal Southern California climate, many homeowners aim for an attic R-value in the R-38 to R-49 range, depending on roof assembly, ventilation, and existing conditions. If your attic already has some insulation, you can “top up” by adding loose-fill or batts to reach the desired total R-value. Always check current local building codes and manufacturer instructions before starting.
Safety and Preparation
Attic work requires planning and protective gear. Always prioritize safety:
1) Wear PPE: gloves, long sleeves, safety glasses, and a NIOSH-approved respirator suitable for particulates. 2) Use kneeboards or plywood sheets to create temporary platforms, and never step between joists. 3) Bring adequate lighting; headlamps and temporary LED work lights can make a big difference. 4) Turn off power to circuits you will be working near if you will be moving electrical wiring or working around junction boxes. 5) Avoid contact with hot fixtures and flues; maintain required clearance to combustibles.
Before installing insulation, inspect for issues that can undermine performance:
– Air leaks: Gaps around plumbing penetrations, wiring, top plates, recessed lights, and attic hatches allow conditioned air to escape. Seal these with appropriate materials such as foam sealant, caulk, or rigid covers, following safety clearances for heat-producing devices. – Moisture: Signs include staining, rusted fasteners, musty odors, or wet sheathing. Address roof leaks, bath fan venting, and ventilation before insulating. – Pests: Rodent droppings, nesting, or chewed materials should be remedied, and contaminated insulation should be removed and disposed of properly.
Ventilation and Baffles
Attic ventilation helps remove heat and moisture. In Malibu, proper soffit-to-ridge airflow reduces heat buildup under the roof deck and keeps insulation dry. Before insulating, install baffles (rafter vents) at eaves to keep intake vents open and maintain a clear air channel. Baffles prevent loose-fill from blocking soffits and help define even coverage depth near the eaves.
Air Sealing Is the Foundation
Insulation works best after air sealing. Close gaps at top plates, plumbing stacks, and wiring holes. Seal around the attic hatch with weatherstripping, and plan to insulate the hatch itself with rigid foam. For recessed lights, check if they are IC-rated (insulation contact) and approved for insulation coverage. If not, maintain the required clearance and consider retrofitting with IC-rated fixtures or approved covers. Proper air sealing reduces drafts, prevents moisture-laden air from entering the attic, and increases the overall effectiveness of the insulation layer.
Choosing Materials for Malibu Homes
Fiberglass loose-fill and cellulose are popular for open attics because they can be blown in to fill irregular spaces. Fiberglass batts are common for accessible joist bays and can be layered if installed without compression. Mineral wool batts provide durability, fire resistance, and sound attenuation. Consider the following:
– Loose-fill: Ideal for covering large areas uniformly. Use depth markers to verify installed R-value. – Batts: Best for consistent joist spacing and visible installation. Cut to fit snugly without compressing the material. – Hybrid approach: Air seal, install baffles, use batts to edge around obstructions, and then top up with loose-fill for uniform coverage and high R-value.
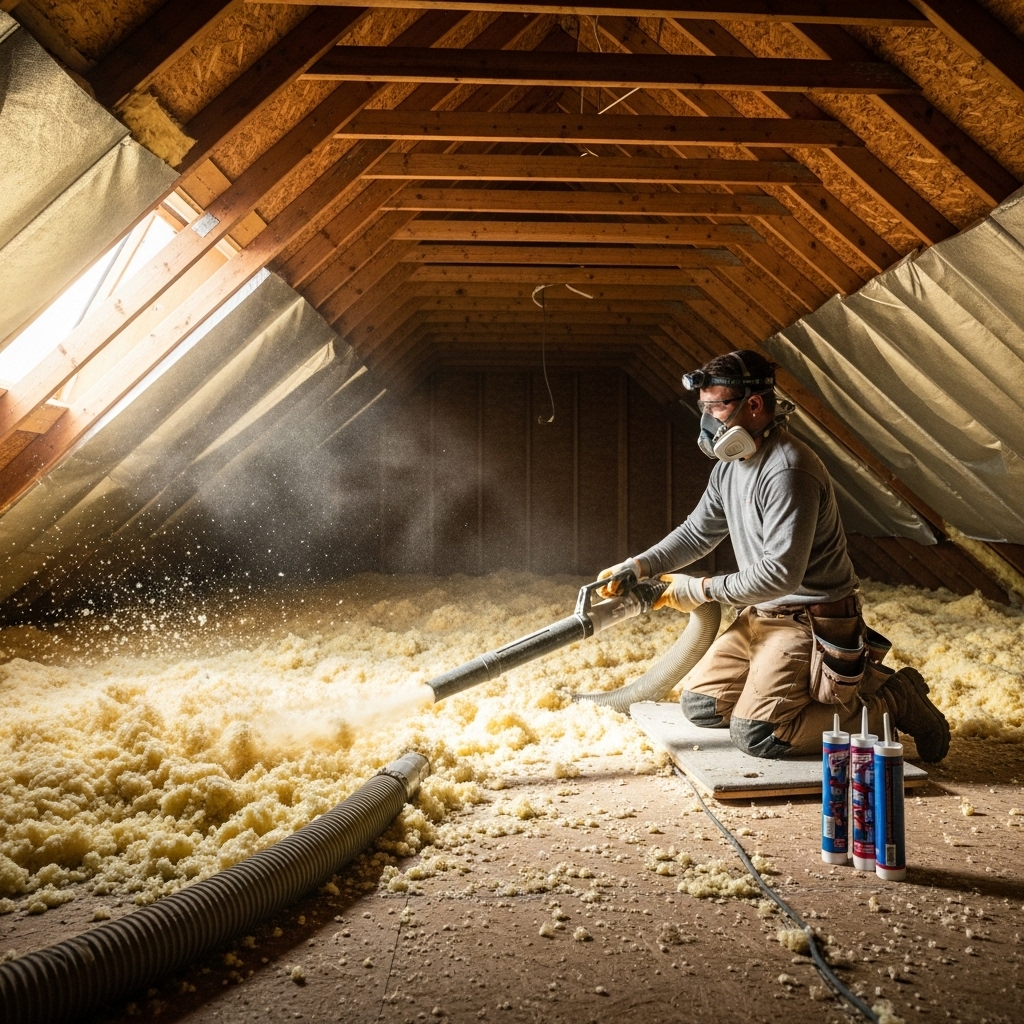
Tools and Supplies
– PPE: gloves, long sleeves, eye protection, and respirator. – Lighting: headlamp and portable LED work lights. – Air sealing: caulk, foam sealant, rigid foam, tape, and fire-rated materials where required. – Insulation: batts, loose-fill, or both, plus rulers or depth markers. – Installation aids: utility knife, straightedge, staple gun, measuring tape, and boards for safe movement. – Blower: for loose-fill, coordinate a rental or delivery with a machine if DIY.
Step-by-Step Installation: Open Attic With Loose-Fill
1) Prepare the attic: Place baffles at every soffit bay, install depth markers throughout, and seal air leaks. 2) Protect heat sources: Maintain clearances around flues and non-IC-rated fixtures using approved barriers. 3) Insulate the hatch: Attach rigid foam to the hatch panel and add weatherstripping to the frame. 4) Stage materials: Position the blower, route hose to the attic, and stage bags of insulation. 5) Blow insulation from the farthest point back toward the entry: Keep the hose tip low and level, moving methodically to ensure even coverage. 6) Monitor depth: Follow the manufacturer’s chart and your depth markers to reach the target R-value. 7) Trim and tidy: Create a higher, reinforced perimeter around the hatch for a clean landing area.
Step-by-Step Installation: Batts Between Joists
1) Measure and cut: Fit batts to the full length of joist bays without compressing. 2) Place gently: The insulation should sit flush to the subfloor below without gaps. 3) Around obstructions: Split batts to fit around wiring or pipes; do not stuff or compress. 4) Second layer: If joists are shallow and you need more R-value, add a second layer perpendicular to the first, covering the joists to reduce thermal bridging. 5) Finish at the hatch: Build a low containment dam and insulate the hatch cover.
Special Considerations for Malibu
– Solar exposure: Roofs heat quickly in full sun; proper ventilation and sufficient R-value will reduce heat transfer into living areas. – Coastal moisture: Ensure bath and kitchen fans vent outdoors, not into the attic. Correct any roof or flashing leaks before insulating. – Wildfire awareness: Malibu’s interface with natural terrain means embers and smoke can intrude. Keep vents in good condition with appropriate, code-compliant screening and consider materials with good fire performance characteristics.
Mid-Project Quality Checks
Pause halfway and evaluate coverage, depth, and air sealing effectiveness. If you can see tops of joists in a loose-fill project, you likely need more material to reach your target. Confirm that soffit baffles remain unobstructed. If you are using batts, check for gaps or compression and correct as you go. This is an ideal point to reassess your plan and ensure you are on track toward your target R-value of R-38 to R-49 for Malibu’s climate. During this midpoint verification, remember that well-installed attic insulation should look continuous and uniform, without low spots, voids, or pinched areas.
Working Around Ducts and Utilities
Avoid covering junction boxes and label their locations for future access. Keep insulation off recessed lights that are not IC-rated. Seal boot-to-drywall gaps at supply registers before insulating. If ducts run through the attic, seal joints and seams and ensure they are insulated to reduce heat gain. Better yet, if the opportunity exists, consider professional evaluation of duct routing and sealing as part of a whole-home approach.
When pipes or vents pierce the roof deck, make sure flashing is intact and watertight. Address any signs of leakage before proceeding. If there is an attic furnace or water heater, maintain required clearances and combustion air pathways, and consult a qualified professional when in doubt.
Common Mistakes to Avoid
– Skipping air sealing: Insulation without air sealing leaves comfort and efficiency on the table. – Blocking ventilation: Keep soffits clear with baffles to avoid moisture and heat buildup. – Compressing insulation: Compression reduces effective R-value. Fit pieces carefully. – Neglecting the hatch: A leaky, uninsulated hatch can undermine your work. – Ignoring safety: Use proper PPE and never cover wiring junctions or violate clearance requirements.
Post-Installation Verification
After installing, double-check depth markers, hatch insulation, baffle positions, and clearances. Take photos for your records. Walk carefully on established pathways to avoid compressing loose-fill or damaging batts. Monitor indoor comfort in the days and weeks after the upgrade; you should notice more stable temperatures and reduced HVAC cycling.
Maintenance and Seasonal Tips
Revisit your attic at least once a year, ideally before peak summer and before winter. Look for displaced insulation, evidence of pests, or any moisture intrusion. Keep ventilation pathways clear, and verify that bath fans and dryer vents exhaust outdoors. If you plan rooftop solar or roofing work, coordinate with your installer to protect the insulation layer and maintain attic ventilation.
Frequently Asked Questions
Q: What R-value should I target in Malibu? A: Many Malibu homeowners aim for R-38 to R-49 in open attics, depending on existing conditions and local code requirements. Always confirm with current code and manufacturer guidance.
Q: Can I install insulation over existing material? A: Yes, if the existing insulation is dry, clean, and free of contaminants. Flatten and distribute it evenly first, address air leaks, and then add your new layer to reach the target R-value.
Q: Do I need a vapor retarder? A: In Malibu’s climate, controlling air leakage and maintaining ventilation are usually higher priorities than Class I vapor retarders. Follow product instructions and local code requirements for vapor control.
Q: Should I choose batts or loose-fill? A: Both work when installed correctly. Loose-fill is excellent for covering large, irregular spaces uniformly, while batts can be effective in attics with consistent joist spacing. Some projects combine both.
Q: How do I keep soffit vents from getting blocked? A: Install baffles along the eaves before placing insulation. They preserve airflow channels from soffit to roof vents and help keep insulation in place.
Q: Can I DIY this, or should I hire a pro? A: Many homeowners can DIY simple, open attics with good preparation. Complex attics with tight spaces, extensive wiring, or mechanical equipment may warrant professional help.
Next Steps for a Comfortable Malibu Home
If you are ready to improve comfort, reduce heat gain, and protect your home against coastal moisture, consider planning your installation with careful air sealing, proper ventilation, and the right R-value. For a smooth, code-compliant project and high-quality results, consult local experts who specialize in Malibu homes. When you are prepared to move forward, schedule an assessment or installation and make the most of professional-grade techniques and materials. To ensure the best results for your home, reach out to a trusted local team and explore your options for attic insulation today.