
Ask any Los Angeles homeowner who has navigated a remodel permit, and they will tell you that energy code requirements are as real as framing and finishes. In California, those requirements live in Title 24, Part 6 of the state code, and they touch almost every decision you make about the thermal boundary of your home. The attic—our city’s primary shield against summer heat—sits at the center of that conversation. Whether you are upgrading an older bungalow in Atwater Village or finalizing a new addition in Mar Vista, understanding how attic insulation is inspected and how it relates to Title 24 can make the difference between a smooth sign-off and frustrating delays.
Over the years, I have crawled, measured, and photographed more attics than I can count, translating code-speak into practical steps for homeowners and contractors. The goal is always the same: a safe, durable, and energy-wise assembly that keeps your rooms comfortable and satisfies the prescriptive or performance path you or your designer selected. To get there, it helps to demystify the inspection process, clarify what inspectors and HERS raters are looking for, and plan the work so that once the insulation truck pulls away, your project is truly ready for final.
At the outset, I often encourage homeowners to get familiar with the basics of attic insulation so the code requirements have context. When you know the role of air sealing, ventilation, and R-values in day-to-day comfort, the checklists used by inspectors feel far less abstract and a lot more like common sense applied consistently.
Prescriptive vs. performance: two paths to compliance
Most Los Angeles residential projects follow either the prescriptive path—meeting or exceeding specific requirements for insulation, windows, ducts, and equipment—or the performance path, which uses energy modeling to demonstrate that the home, as a whole, performs at or better than a baseline. In practice, even performance-path projects tend to hit prescriptive targets in the attic because the attic is such a high-leverage area for reducing heat gain. In many Southern California situations, a common attic prescriptive target is around R-38 or higher for low-rise residential, but your exact requirement can vary with project type and current code cycle. Always confirm with your designer and local jurisdiction.
What inspectors and HERS raters actually check
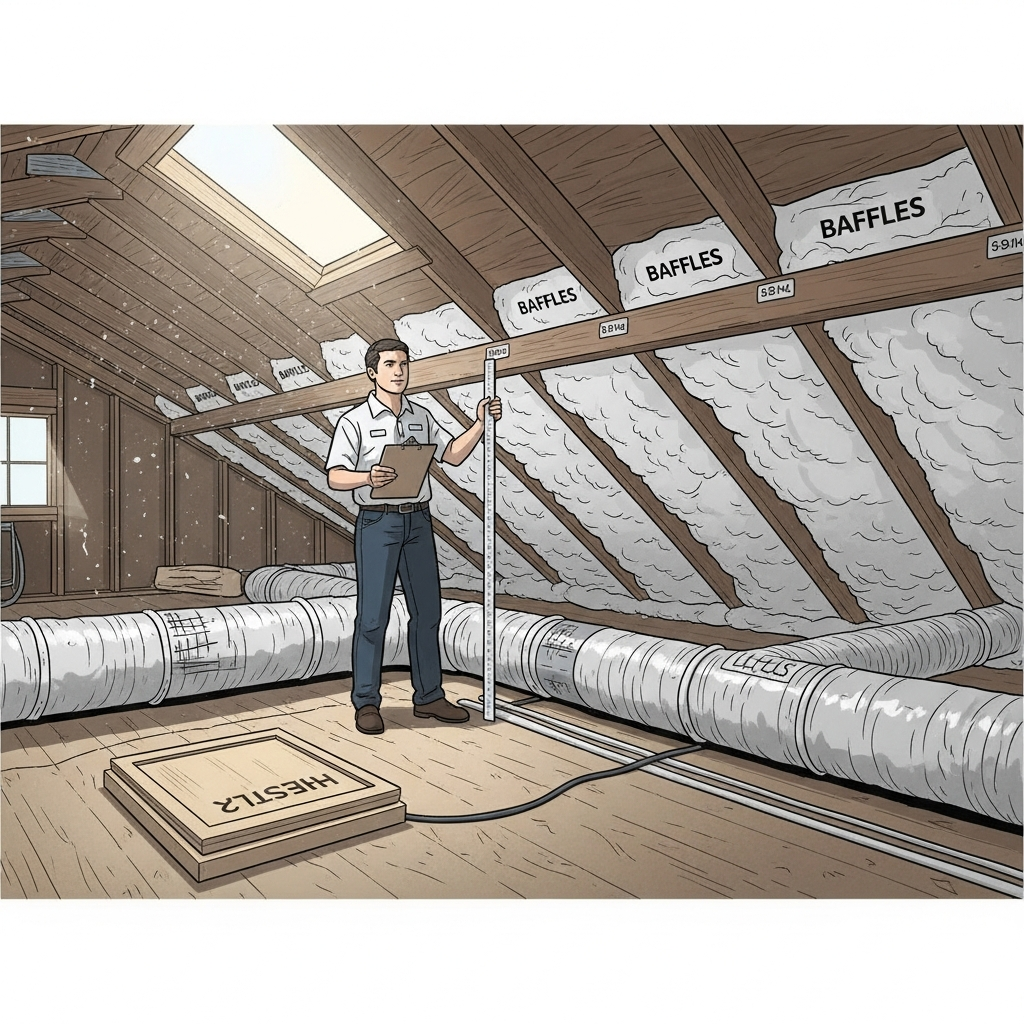
An attic insulation inspection is not a glance from the hatch; it is a methodical look at several details that together determine performance. Expect the reviewer to look for consistent coverage and depth, with rulers or depth markers visible for blown-in materials. They will check for proper baffles at eaves to maintain ventilation and to keep insulation out of soffits. Around recessed lighting, the expectation is that fixtures are rated for insulation contact or protected by listed covers, and that clearances around flues and chimneys are maintained with appropriate fire-resistant barriers. The attic access hatch should be insulated and weatherstripped, not just a bare piece of plywood.
If ducts run through the attic, a HERS rater may be called to verify duct sealing and insulation levels. HERS verification can also apply to quality insulation installation (QII) in some projects, assessing whether insulation is aligned with air barriers and free of gaps, compression, and voids. While QII is often associated with walls, the principles matter just as much in the attic: an even blanket of insulation, aligned with a continuous ceiling air barrier, and uninterrupted by careless workmanship.
Air sealing: the foundation beneath the fluff
Code compliance and comfort both begin with air sealing. Inspectors look for sealed top plates, foam or caulk at wire and pipe penetrations, and thorough treatment of chases, dropped soffits, and other transitions. Without this step, the attic can become a pressure-driven conduit for hot air and dust, and even generous insulation will underperform. In my field notes, the projects that pass smoothly almost always have photographed evidence of air sealing before insulation goes in, along with labeled materials and methods so the inspector can see what is now concealed.
Ventilation and moisture control
Los Angeles is not known for high indoor humidity in summer, but ventilation remains a critical part of the roof assembly. Balanced soffit and ridge or gable venting allows the attic to purge heat and any incidental moisture quickly. Inspectors check for clear air pathways protected by baffles at eaves, ensuring that insulation has not been stuffed into soffits. In complex roofs with valleys, dormers, and intersecting planes, it takes careful planning to keep airflow unobstructed. A cool, dry attic is an inspector’s friend and a homeowner’s ally for long-term durability.
Depth, coverage, and details that make or break a pass
Most corrections I see after failed inspections are about details, not intent. Depth is short near the eaves, batt edges are gapped at truss chords, or a half-dozen light fixtures are missing covers. Depth markers should be installed before blowing in loose-fill, and the installer should fluff and level material to the specified depth across the entire field, not just the center where it is easy. Where batts are used, they must be cut to fit snugly, with no gaps at edges or around obstructions. Around attic hatches, a weatherstripped, insulated cover makes a measurable difference and is frequently called out if missing.
Coordinating trades to avoid rework
Nothing derails an attic inspection like discovering that an electrician added six recessed lights after the insulation was installed, or that a low-voltage contractor burrowed channels through the new blanket. The solution is coordination. Insist that all rough-ins above the ceiling are complete and inspected before insulation day. If you expect future upgrades, consider prewiring or leaving conduits to avoid tearing into the attic later. A brief, mid-project meeting in the attic with your GC and trade leads can save hours of cleanup and expensive schedule drift.
Documentation and the value of photographs
Inspectors and HERS raters appreciate clear evidence. Before covering your air sealing with insulation, take photos of sealed top plates, insulated and gasketed hatches, baffles at every eave bay, and protective measures around flues and lights. Label the insulation product and R-value on a small placard near the hatch. If you buried ducts, document their sealing and insulation level before they disappear under new material. This simple archive resolves questions quickly and shows that you approached the attic as a system, not a last-minute checkbox.
Mid-project reality checks
Partway through many upgrades, I pause with homeowners to revisit the goal: a cooler, quieter, and code-compliant home. This is a good moment to re-affirm whether the selected product and target R-value are still appropriate given any late design changes. It is also when I remind folks that upgraded attic insulation is more than numbers on a form. The evenness of coverage, the integrity of air sealing, and the protection of ventilation paths are what you feel in July when the sun rides high and the city hums with AC compressors.
Common pitfalls and how to avoid them
A few mistakes come up so often they deserve a checklist in your mind. Do not block soffits with insulation; use baffles. Do not leave can lights unprotected; use IC-rated fixtures or listed covers and maintain clearances. Do not assume ducts are tight; test and seal them. Do not forget the hatch cover; insulate and weatherstrip it. Do not compress batts under storage; build raised platforms if you need overhead space. Each of these items seems small on its own, but together they determine whether your attic works as a cohesive shield against summer heat.
Title 24 forms and who signs what
On permitted projects, you will encounter a set of energy compliance documents. Designers or energy consultants typically prepare the initial model and CF1R forms. Contractors execute the work and complete CF2R installation certificates. HERS raters, when required, perform field verification and testing documented on CF3R forms. While this paperwork can feel abstract, the attic is where it becomes tangible. A properly insulated and sealed attic makes it easier for your project to meet its modeled targets, and clear documentation speeds the approval process.
Looking beyond inspection day
Passing inspection is a milestone, not the finish line. Your attic should be ready for the realities of Los Angeles summers: long runs of sun, occasional heat waves, and late-afternoon peaks in cooling demand. An attic that passes with flying colors is one that will feel calmer indoors, preserve morning cool into the afternoon, and keep your AC from cycling itself into a frenzy. It will also be easier to maintain because the details—baffles, covers, platforms—were handled thoughtfully from the start.
Frequently Asked Questions
Q: What R-value is required for attics under Title 24?
A: Requirements vary by climate zone and code cycle, but many Southern California projects target around R-38 or higher for low-rise residential under the prescriptive path. Confirm the current standard with your designer and local jurisdiction.
Q: Do I need a HERS rater for my attic insulation?
A: Not always. HERS verification is required for certain measures like duct sealing and QII on some projects. Your permit documents will indicate when HERS is needed.
Q: Can I pass inspection if I leave old insulation in place and add more?
A: Yes, provided the existing material is clean, dry, and compatible, and the final assembly meets coverage, depth, and detailing requirements. Air sealing is essential before adding more.
Q: Are radiant barriers required?
A: They are not universally required. In some assemblies or designs, a radiant barrier can complement insulation. The choice depends on the roof structure and your compliance path.
Q: What if my attic has limited height near the eaves?
A: Plan for tapered insulation, rigid dams to protect ventilation, and meticulous air sealing in those tight spots. Even coverage matters more than a single deep spot in the center.
Q: How long does the inspection take?
A: It depends on access and complexity, but a focused inspection or HERS visit typically takes under an hour. Good preparation and documentation keep it smooth.
When you are ready to turn code requirements into daily comfort you can feel, partner with a team that treats your attic as the beating heart of summer performance. Careful planning, precise installation, and clear documentation come together to create a home that stands up to July and August without drama. Begin the process by exploring your options for upgraded attic insulation, and step into your next inspection with confidence that what keeps you comfortable will also satisfy the code.