
Attic Insulation Removal in Camarillo: Process, Safety, and How to Prepare
You pull down the attic hatch and catch a faint, musty smell, or notice a thin layer of grit settling on the ceiling drywall below. For Camarillo homeowners, that moment is often the first sign that the insulation overhead has reached the end of its useful life. Attic insulation removal is the necessary first step before any new insulation can do its job, yet it is one of the least understood services in the home-improvement lifecycle. This guide walks you through what the process actually involves, what safety protocols a qualified contractor must follow, and how to get your attic ready so the project goes smoothly from day one.
Why Attic Insulation Removal Is More Than Just a Clean-Out
Pulling old insulation out of an attic is not the same as clearing out stored boxes. Decades-old fiberglass batts or blown-in cellulose can harbor rodent droppings, mold spores, pest debris, and settled dust that has accumulated since the home was built. When disturbed without proper containment, these particles migrate into living spaces through ceiling gaps, recessed lights, and HVAC returns.
Beyond contamination, compromised insulation actively works against your home. Compressed, wet, or rodent-tunneled material loses its R-value, meaning your HVAC system runs harder to maintain comfortable temperatures. Removing the old layer before installing fresh insulation ensures the new material performs at its rated R-value from day one, rather than sitting on top of a degraded base that undermines the whole assembly.
If you are still weighing whether your attic actually needs this service, recognizing the warning signs early can save you from a more costly remediation later.
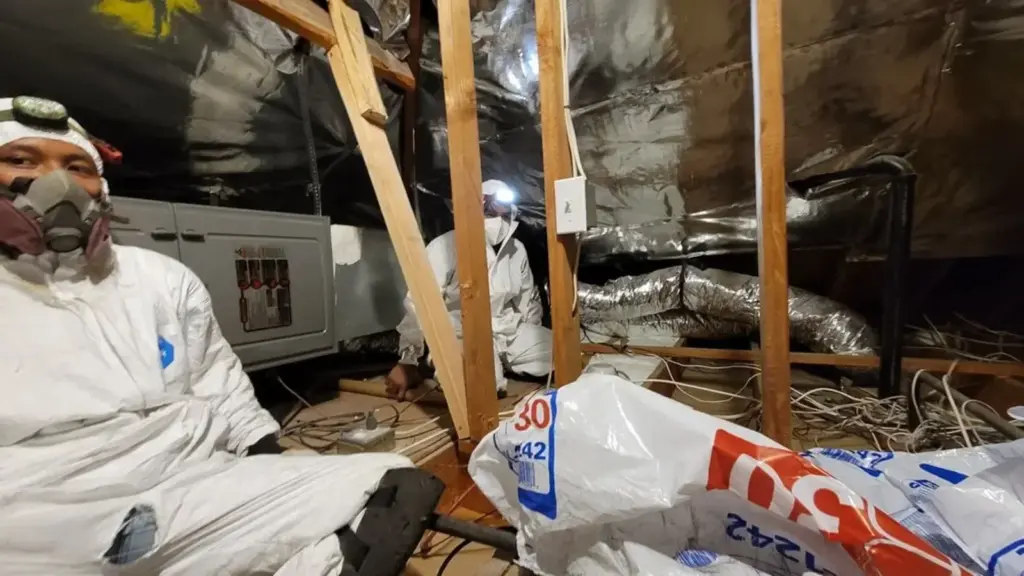
The Step-by-Step Insulation Removal Process
Understanding what a professional crew does on the day of service helps you evaluate bids accurately and spot shortcuts before they happen.
1. Pre-Job Inspection and Documentation
A thorough contractor photographs the attic before touching anything. This documents the existing insulation depth and type, identifies any pre-existing moisture damage, and locates areas where rodent activity or mold may require additional remediation. The inspection also confirms whether any material is vermiculite-based, which can contain asbestos and requires separate handling protocols.
2. Containment and Negative Pressure Setup
Before the first bag of old insulation moves, the crew seals the attic access point and any ceiling penetrations with plastic sheeting. A commercial-grade HEPA vacuum unit is positioned outside the home, with a long flexible hose run up into the attic. This negative-pressure setup pulls air (and airborne particles) out of the attic rather than letting them drift into the house. Crew members wear full Tyvek suits, N100 respirators, and eye protection throughout.
3. Mechanical Vacuuming of Blown-In Material
Loose-fill cellulose or blown fiberglass is vacuumed directly into sealed disposal bags using the industrial hose. A single attic can generate a surprising number of heavy bags, which are staged outside and hauled to a licensed disposal facility. The process is slow and methodical, working from the far corners toward the access hatch so the crew is never walking back over cleaned areas.
4. Manual Removal of Batt Insulation
Fiberglass or mineral wool batts that were stapled between joists are pulled by hand, bagged, and removed. This step also uncovers the joist cavities so the crew can inspect the sheathing and framing for moisture staining, pest damage, or air-sealing gaps that should be addressed before new insulation goes in.
5. Post-Removal Debris Cleanup and Sanitization
After the bulk material is out, any remaining debris, droppings, or soiled material is cleaned from joist tops and the attic floor. If rodent activity was present, an EPA-registered sanitizer is applied to the affected surfaces. This step is non-negotiable: skipping it leaves biological contamination that new insulation will simply trap rather than eliminate.
If you want it handled correctly the first time, consider professional attic insulation in Malibu.
6. Final Inspection and Attic Preparation
The attic is re-inspected, photographed, and any air-sealing or minor structural concerns are noted. At this point the space is ready for the installation phase. For a detailed look at what happens between removal and re-insulation, see preparing your attic after insulation removal.
Safety Requirements Every Camarillo Contractor Must Meet
Safety in attic insulation removal is not optional, and a reputable attic insulation contractor in Camarillo will be transparent about every protocol without being asked. Here is what to expect and verify before signing any contract.
| Safety Area | What a Qualified Contractor Does | Red Flag to Watch For |
|---|---|---|
| Respiratory Protection | N100 or P100 half-face respirators for all crew members in the attic | Dust masks or surgical masks used instead |
| Containment | Plastic sheeting over access hatch; HEPA vacuum with negative pressure | Attic hatch left open; no vacuum unit on-site |
| Disposal | Sealed heavy-duty bags; licensed disposal facility manifest available | Material dumped in your curbside trash or left on-site |
| Asbestos Awareness | Asks about home age; tests or refers out if vermiculite is present | Proceeds without asking about material type or home vintage |
| Licensing and Insurance | C-2 or C-17 contractor license; general liability and workers’ comp on file | Cannot produce a license number or certificate of insurance |
| Post-Removal Sanitization | EPA-registered product applied if biological contamination is found | Skips sanitization or charges separately without disclosing it upfront |
For a deeper list of questions to bring to your first call, these contractor interview questions are worth reviewing before you request any bids.
Camarillo’s Housing Stock and Why It Creates Specific Removal Challenges
Camarillo’s residential neighborhoods reflect several distinct construction eras, each with its own insulation legacy. The tracts built through the 1960s and 1970s in areas like Mission Oaks and Camarillo Heights often have original blown-in fiberglass or early cellulose that has been compressed for decades, sometimes supplemented by a later batt layer added during an energy retrofit. This layering complicates removal because the crew must work through multiple material types in the same joist cavity.
Ventura County’s coastal influence also matters. Camarillo sits in a marine-influenced climate zone where morning fog and seasonal humidity cycles are common. Attics in homes with inadequate ridge or soffit ventilation can accumulate enough moisture over years to degrade insulation and encourage mold growth along the north-facing roof sheathing, a pattern contractors familiar with this area recognize immediately. Homes near the Camarillo Airport corridor also see more particulate infiltration from prevailing winds, which accelerates how quickly blown-in material becomes contaminated.
Finally, many Camarillo homes built before 1980 used vermiculite as an attic fill or had asbestos-containing duct wrap. Any contractor quoting a job on a pre-1980 home should address this possibility in writing, either confirming the material is safe or recommending a certified asbestos test before proceeding.
DIY vs. Professional Removal: An Honest Assessment
Some homeowners consider renting a vacuum and handling removal themselves. The appeal is understandable, but the risks deserve a clear-eyed look. Residential vacuum rentals rarely generate the suction needed to fully clear dense or matted blown-in material, leaving behind a thin contaminated layer that undermines the new installation. More critically, without proper respirators and containment, a DIY attempt can spread fine particulates throughout the living space in ways that take weeks to settle out.
Many Malibu homeowners rely on expert attic insulation in Malibu for exactly this.
There are also liability considerations: if the removed material contains asbestos or mold and it is disturbed without proper protocols, the homeowner bears responsibility for any resulting remediation. Professional crews carry the licensing, equipment, and insurance to handle those scenarios correctly.
Comparing DIY and professional removal in detail lays out exactly where the cost-benefit math shifts in favor of hiring a licensed crew.
How to Prepare Your Home Before the Crew Arrives
A well-prepared home speeds up the job and protects your belongings. Here is a practical checklist for the days leading up to your scheduled service.
- Clear the attic access area. Move furniture, boxes, or clothing stored in the hallway or closet below the hatch. The crew needs clear floor space to stage equipment and run the vacuum hose.
- Remove stored items from the attic. Any belongings stored in the attic should come out before the crew arrives. Leaving items in place risks contamination and slows the job.
- Confirm HVAC is off or filtered. Ask your contractor whether the HVAC system should be shut off during the job. Many crews prefer the system off so the air handler does not pull attic air into ducts during removal.
- Protect interior surfaces near the hatch. Lay a drop cloth on the floor directly below the access point. Even with good containment, small amounts of debris can escape during hatch transitions.
- Make note of any known issues. If you have seen rodent activity, smelled mold, or noticed wet spots on the ceiling, tell the contractor before work begins. This information affects both the scope and the safety protocols.
- Plan for temporary displacement. For full attic removals, it is reasonable to plan to be out of the house or at least out of the rooms below the attic for the duration of the job.
Understanding What Drives the Cost of Removal
While this guide does not quote specific figures, understanding what influences the final scope helps you compare bids fairly. The primary cost drivers for attic insulation removal in Camarillo are attic square footage, the type and depth of existing material, accessibility (low-pitch roofs and tight knee-wall spaces take longer), the presence of contamination requiring sanitization, and disposal fees tied to the volume of material removed.
A bid that seems unusually low often reflects one of three shortcuts: skipping sanitization, using undersized equipment that leaves residual material, or disposing of waste improperly. Asking each contractor to itemize these line items makes the comparison meaningful rather than just comparing a single bottom-line number.
For a full breakdown of what goes into pricing a removal project, the cost factors specific to Camarillo attic projects covers each driver in depth.
From Removal to Reinstallation: The Full Service Picture
Ready for the next step? Learn how attic insulation services in Malibu can help and reach out to the team.
Attic insulation removal is rarely the end goal on its own. Most homeowners scheduling a removal are also planning to address air sealing, replace damaged ductwork, or install new insulation to current California Title 24 standards. Coordinating these services with a single contractor who handles the full scope, from removal through reinstallation, reduces the risk of miscommunication between trades and ensures the attic is handed off in the correct condition at each stage.
LA Attic Pro handles the complete insulation replacement lifecycle in Camarillo and throughout Ventura County, from initial removal and sanitization through new insulation installation. If your attic also has aging ductwork, combining a duct inspection with your insulation project is an efficient use of the access time. Ready to get a clear picture of what your attic needs? schedule your attic insulation removal assessment and we will walk you through every step before any work begins.
Frequently Asked Questions
How long does attic insulation removal take in a typical Camarillo home?
Most single-story homes in Camarillo with standard attic access take one full day for removal and cleanup. Larger homes, those with very low roof pitches, or attics with heavy contamination may extend to two days. Your contractor should give you a time estimate after the pre-job inspection, not before seeing the space.
Do I need a permit to remove attic insulation in Camarillo?
Insulation removal on its own typically does not require a building permit in most California jurisdictions, but requirements can vary. When new insulation is installed afterward, a permit is often required to verify the work meets Title 24 energy standards. Confirm the permit requirements with your contractor and the City of Camarillo Building and Safety Division before work begins, as rules can change.
What happens if asbestos is found in my attic insulation?
If a pre-job inspection or sample test identifies asbestos-containing material, standard insulation removal must stop. Asbestos abatement requires a separately licensed contractor following California DOSH regulations and specific disposal protocols. A responsible attic insulation contractor will refer you to a certified abatement firm rather than proceed with unprotected removal.
Can new insulation be installed the same day as removal?
In some cases, yes, particularly when the attic is clean, dry, and free of contamination after removal. However, if sanitization is required or if air sealing work needs to cure, the installation phase is typically scheduled for the following day. Your contractor should outline the realistic timeline during the initial assessment.
How do I know if all the old insulation was actually removed?
Ask for before-and-after photographs taken at the same reference points in the attic. A thorough contractor documents the cleared joist cavities so you can see the bare framing. You can also request to inspect the attic yourself before the crew packs up, which any reputable contractor will welcome.
Does removing old insulation improve indoor air quality?
Homeowners often notice the air in their home feels fresher after a full removal and sanitization, particularly when the old material harbored dust, pet dander, or rodent debris. While we do not make medical claims, removing heavily contaminated insulation eliminates a reservoir of particulates that would otherwise continue to circulate. The improvement is most noticeable in homes with older, heavily degraded material.
Making the Right Choice for Your Camarillo Attic
Attic insulation removal is a specialized job that sets the foundation for every energy and comfort improvement that follows. Camarillo homeowners who take the time to understand the process, verify contractor credentials, and prepare their homes properly get better outcomes, cleaner attics, and new insulation that actually performs as rated. When you are ready to move forward, LA Attic Pro is available for a no-pressure assessment of your attic’s current condition. Contact us to book your insulation removal consultation and get a clear, itemized picture of what your project involves before committing to anything.