
What to Do After Attic Insulation Removal in Camarillo: Step-by-Step Prep Guide
You climb the pull-down stairs, flashlight in hand, and for the first time in years the attic is bare. The old insulation is gone, the vacuum hoses have been rolled up, and the crew has left. It feels like progress, and it is. But in Camarillo homes, that freshly cleared attic space is also a window that closes fast: the gap between extraction and re-installation is exactly when the most important prep work happens, and skipping any of it can cancel out the efficiency gains you are paying for.
This guide walks you through every step of attic preparation after insulation removal, specific to the conditions Camarillo homeowners actually face. Whether your attic just had decades-old fiberglass pulled out or you are recovering from rodent activity, the sequence below helps ensure new insulation performs the way it should. For context on the removal phase itself, review the complete attic insulation removal guide before starting here.
Before You Start: What You Will Need
- N95 or P100 respirator (even after removal, fine particulates linger)
- Disposable coveralls and nitrile gloves
- Safety glasses or goggles
- Bright work light or headlamp rated for attic use
- Low-expansion spray foam (for small penetrations you can safely reach)
- Weatherstripping or foam backer rod (for attic hatch sealing)
- Enzymatic or EPA-registered sanitizing solution (if rodent or mold contamination was present)
- Stiff-bristle brush and bucket (for scrubbing decking if needed)
- Caulk gun and fire-rated caulk (for penetrations near heat sources)
- Measuring tape and notepad (to document gap locations for your contractor)
- Camera or smartphone (to photograph problem areas)
A few of these tasks, particularly anything involving electrical junction boxes, gas lines, or large structural gaps, should be handed off to a licensed professional rather than attempted as DIY. The steps below flag those moments clearly.
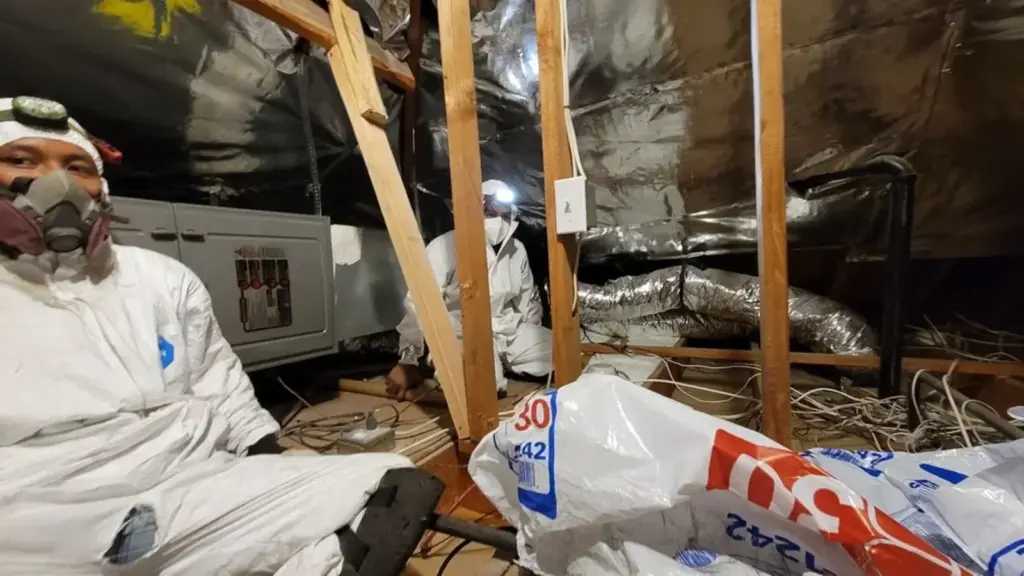
Step 1: Inspect the Attic Floor and Decking Thoroughly
Once the insulation is out, walk the attic floor carefully, testing each joist with your weight before committing to it. In many Camarillo homes built between the 1960s and 1990s, the decking consists of OSB or plywood panels laid over joists, and years of trapped moisture or pest activity can leave soft spots that are invisible beneath insulation. Look for discoloration, soft or spongy wood, and any areas where the decking has separated from the joists. Photograph every problem area. You do not need to fix structural issues yourself, but you do need to document them so your insulation contractor or a carpenter can address them before new material goes in. Installing fresh insulation over compromised decking locks the damage in place and makes future repairs far more disruptive.
Step 2: Check for Remaining Debris and Spot-Clean the Attic Floor
Professional vacuum extraction removes the bulk of old insulation, but fine dust, cellulose fibers, and debris fragments almost always remain in corners, along the eave lines, and around obstructions like HVAC equipment. Use a bright work light to sweep the beam across the floor at a low angle, which makes residual material easier to spot. Collect loose debris in heavy-duty contractor bags. If rodent droppings or nesting material were part of the reason for removal, do not dry-sweep or use a standard vacuum; those actions aerosolize contaminants. Instead, lightly mist the area with an EPA-registered disinfectant, let it dwell for the manufacturer’s recommended time, then carefully wipe or damp-mop surfaces before bagging waste. Seal and dispose of bags according to your local Ventura County waste guidelines.
Step 3: Sanitize If Biological Contamination Was Present
Camarillo’s mild, dry climate is attractive to roof rats and mice, and attic spaces in older neighborhoods near open space corridors see a disproportionate share of rodent activity. If your removal uncovered nesting material, urine staining, or significant droppings, sanitization is not optional. Apply an enzymatic or EPA-registered sanitizing solution to wood surfaces, joists, and any remaining framing. Let it dwell according to label directions. For heavy infestations, a fogging application by a licensed pest or attic remediation professional reaches areas that manual spraying misses. This step also applies to any areas showing early mold growth, which can appear when moisture has been trapped under old insulation for extended periods. Skipping sanitization and immediately re-insulating creates a sealed environment where biological material continues to break down, and that is a problem that compounds over time.
If you are uncertain whether your attic needs this level of treatment, the signs that indicate a full attic remediation article covers the indicators that separate a simple swap from a deeper cleanup job.
Step 4: Seal Air Leaks at Every Penetration
This is the single most impactful step in the entire preparation sequence, and it is consistently the most under-appreciated. Air sealing before re-insulation can measurably improve energy performance, because insulation slows conductive heat transfer but does nothing to stop conditioned air from escaping through gaps. In Camarillo, where summer temperatures regularly climb into the 90s and homeowners run air conditioning for months at a stretch, unsealed attic penetrations translate directly into higher energy bills.
Common penetration points to address include:
If you want it handled correctly the first time, consider professional attic insulation in Malibu.
- Gaps around top plates where interior walls meet the attic floor
- Plumbing vent pipes and drain stacks passing through the ceiling
- Electrical wiring runs and junction box openings (use fire-rated materials near junction boxes)
- Recessed light cans (older IC-rated or non-IC cans require specific sealing methods)
- HVAC supply and return penetrations
- Chimney chases and any masonry or metal flue passages
- The attic access hatch itself
For small gaps around pipes and wiring, low-expansion spray foam works well and is a manageable DIY task. For anything adjacent to heat sources, recessed lights, or electrical panels, use fire-rated caulk or intumescent foam, and when in doubt, call a licensed contractor. Requirements for clearances and materials around heat-producing fixtures vary, so confirm with a professional rather than guessing. The attic hatch is frequently overlooked: add weatherstripping to the frame and, if the hatch cover is uninsulated, attach a rigid foam board to the attic-side face before new insulation is installed around it.
Step 5: Assess and Address Ventilation Pathways
Proper attic ventilation is a balancing act, and the removal process is a good opportunity to verify that intake and exhaust pathways are clear and functioning. In Camarillo, most homes use a combination of soffit vents at the eaves and either ridge vents or gable vents near the peak. Check that soffit baffles, the channels that keep insulation from blocking airflow at the eave line, are in place and undamaged. If they were removed or crushed during the extraction process, replace them before new insulation is blown or laid in. Without functioning baffles, insulation packs against the soffit vents and cuts off the intake air that allows the attic to breathe, which leads to moisture buildup and heat loading. Also inspect ridge vents and gable screens for blockages, bird nests, or damaged mesh.
Step 6: Inspect Ductwork and HVAC Components
With the attic floor clear, you have a rare unobstructed view of any ductwork running through the space. Look for disconnected flex duct joints, torn duct wrap, or sections that have sagged and kinked. Leaking ducts in an unconditioned attic are a significant energy drain, and re-insulating over damaged ducts buries the problem. If you spot obvious disconnections or large tears, contact an HVAC professional for duct repair or replacement before insulation goes back in. For a broader look at how duct condition intersects with your attic project, the attic insulation removal service overview covers how contractors typically coordinate these scopes of work.
Also check that any attic-mounted equipment, such as an air handler, is properly supported and that its condensate drain line is intact. Drips or standing moisture around HVAC equipment should be resolved before new insulation surrounds it.
Step 7: Document Everything and Communicate With Your Contractor
Before your insulation installation crew arrives, compile your inspection findings into a simple document or photo album. Note the locations of any gaps you sealed, areas of wood damage you could not address, duct sections that need attention, and any spots where you observed moisture staining. This record serves two purposes: it helps the installer plan their approach, and it gives you a baseline you can reference if any issues arise after the new insulation is in place.
This is also the moment to confirm the insulation type, depth, and target R-value with your contractor. In Camarillo, local energy codes and Title 24 requirements influence the minimum R-value for attic insulation, and those requirements can vary based on the home’s age and the scope of the project. Requirements vary by jurisdiction and project type, so confirm the applicable standard with your licensed contractor rather than relying on general rules. If you have questions about what to ask your installer before work begins, the questions to ask your Camarillo insulation contractor resource walks through the key topics to cover.
Step 8: Prepare the Living Space Below
Attic prep work generates dust and occasionally requires opening the access hatch multiple times. Before the installation crew arrives, take a few minutes to protect the living space directly below. Move furniture and valuables away from under the attic hatch. Lay a drop cloth or old sheet on the floor in that area. If your HVAC system has a return air intake near the attic access, tape a temporary filter over it or set the system to fan-off mode during the installation day to prevent attic dust from circulating through the house. These are small steps, but they make cleanup after installation significantly easier.
Step 9: Confirm the Installation Timeline and Access Plan
Insulation installation, particularly blown-in fiberglass or cellulose, moves quickly once it starts, but the setup, equipment staging, and cleanup add time on both ends. Confirm with your contractor exactly how they plan to access the attic, whether through the interior hatch, a gable vent, or a roof access point, and what areas of the home they will need to move through. In Camarillo’s typical single-story ranch and two-story tract homes, the equipment hose often runs from a truck-mounted blower through a window or door, so clearing that path in advance saves time. Agree on a start time, an estimated completion window, and who to contact if questions come up during the job.
Many Malibu homeowners rely on expert attic insulation in Malibu for exactly this.
When to Call a Professional in Camarillo
Several situations during attic preparation fall outside what a homeowner should handle independently:
- Visible mold covering large surface areas: Spot mold on a joist or two can often be treated with an EPA-registered product, but extensive mold growth requires professional remediation to meet California guidelines and to ensure the source moisture issue is resolved.
- Structural wood damage: Soft, rotted, or pest-damaged joists and decking need a licensed carpenter or structural contractor before any insulation work proceeds.
- Asbestos-containing materials: Homes in Camarillo built before the mid-1980s may have vermiculite insulation, pipe wrap, or other materials containing asbestos. If you suspect any material might contain asbestos, stop work and contact a licensed asbestos abatement professional. Do not disturb the material.
- Active pest infestations: If rodent activity is ongoing rather than historical, rodent-proofing needs to happen before re-insulation, or the new material will simply become new nesting habitat.
- Electrical concerns: Exposed wiring, scorched insulation around fixtures, or junction boxes without covers should be evaluated by a licensed electrician before the attic is re-insulated.
- Significant duct disconnections or HVAC issues: These require a licensed HVAC contractor, not an insulation crew.
LA Attic Pro handles the full scope of attic preparation work in Camarillo, including sanitization, air sealing, rodent-proofing, and coordination with other trades. Reaching out early in the process, before the installation date, gives the team time to assess what the attic actually needs rather than discovering surprises on installation day. Contact us to schedule a professional attic inspection and preparation estimate for your Camarillo home.
Frequently Asked Questions
How long does attic preparation take before new insulation can be installed?
For a straightforward swap with no contamination or structural issues, basic air sealing and cleanup can often be completed in a few hours by a professional crew. When sanitization, rodent-proofing, or duct repairs are needed, the preparation phase may extend to a full day or require scheduling separate trades before insulation installation can proceed.
Do I need to air seal if my house is newer?
Newer Camarillo homes built under more recent Title 24 standards were constructed with better initial air sealing than homes from earlier decades, but construction gaps, settling, and HVAC penetrations added after original construction still create leakage paths. A visual inspection during the open-attic window is worthwhile regardless of the home’s age.
Can I re-insulate the same day the old insulation is removed?
Technically yes, if the attic is clean, dry, and free of contamination. In practice, most experienced contractors prefer to complete air sealing and any remediation work before blowing in new material, which may mean scheduling installation for the following day. Rushing this sequence to save a day can compromise the long-term performance of the new insulation.
What R-value should I target for my Camarillo attic?
California’s Title 24 energy code sets minimum R-value requirements that depend on climate zone, the home’s age, and the scope of the project. Camarillo falls in a climate zone where attic insulation requirements are meaningful but not as extreme as inland desert areas. Confirm the applicable requirement with your licensed insulation contractor, who can also advise on whether exceeding the minimum makes sense for your specific home and energy goals.
Is sanitization always necessary after insulation removal?
Not always. If the old insulation was removed due to age or settling rather than contamination, and the attic shows no signs of pest activity, moisture damage, or mold, a thorough cleanup and air sealing may be sufficient. Your contractor should assess the attic condition during or immediately after extraction and recommend sanitization only when the evidence supports it.
The Attic Is Ready: What Comes Next
A properly prepared attic is the foundation that makes new insulation perform as intended. In Camarillo, where energy costs, pest pressure, and aging housing stock all create real stakes for this work, the preparation phase is not a formality. Every gap sealed, every contaminated surface treated, and every duct connection verified before new insulation goes in is work that pays off over the life of the home.
If you are still in the evaluation stage and want to understand the full removal process before committing to a contractor, the attic insulation removal service guide covers what a professional extraction involves from start to finish. And if you are weighing how to choose the right crew for the job, the contractor selection checklist gives you a practical framework for comparing your options.
LA Attic Pro serves Camarillo and the surrounding Ventura County area with the full sequence of attic work: removal, preparation, and installation. Reach out to schedule an assessment and get a clear picture of what your attic needs before any work begins.